SuperDuper! 4 User's Guide
Welcome to the SuperDuper 4 User’s Guide. It’s built to get you up and running as fast as possible: the most common things people do with SuperDuper, each in its own chapter, step by step.
SuperDuper 4 is a ground-up rewrite. If you’ve used SuperDuper before, the ideas are all still here—a fast, honest, drag-and-drop-friendly copy you can actually understand—but the way you drive it is new. Instead of a single window with a row of pop-ups, you build copy jobs by editing a plain-English sentence that describes exactly what’s going to happen. It always reads back what it’s about to do, so there are no surprises.
Welcome to SuperDuper! 4
Backing up is one of those things that never seems important until something goes horribly wrong—and then it’s the only thing that matters. Most backup programs try to do too much for the “normal” person. Rather than making it easy and fast to get your data safe, they pile on complexity until the whole thing becomes a chore you quietly stop doing.
That’s exactly backwards. I think a backup should be easy to understand, fast, and free of any “lock-in”: your copy should be your data, sitting on a drive, in a totally normal form you can open, read, and use, without SuperDuper’s—or anyone else’s—permission.
In fact, I think backups are so important that SuperDuper has always made the ability to make full backups completely free, including support.
What a “copy” is
Everything in SuperDuper 4 is a copy—a faithful duplicate of a source you choose, written to a destination you choose. That copy can be a lot of different things:
- A backup of your whole startup drive, so a dead disk is an inconvenience instead of a disaster.
- A bootable copy of your Mac (on supported configurations), ready to become your internal drive’s replacement.
Both of those can be used as the source for Migration Assistant, or restored during first boot of a fresh install: you don’t need the OS for that.
- A copy of just your user files—your Home folder and personal data—kept somewhere safe.
- A copy to a spare drive you rotate offsite, so a stolen laptop or a spilled coffee doesn’t take your only copy with it.
- Or, finally, a copy of virtually any drive you connect to your Mac: a photo drive, SD card, external hard disk…you name it.
You don’t have to learn a special vocabulary to do any of it. You pick a source, pick a destination, and SuperDuper describes precisely what it will do. When that says what you want, you click Copy Now.
When you’ll actually need it
It helps to be honest about when real people reach for a backup, because it tells you what a backup actually needs to do. For most of us, it’s one of these:
- You made a bad mistake—deleted or overwrote an important file. (You almost always notice this immediately, and it’s typically accompanied by an expletive. Or two.)
- A drive or a Mac failed, or was lost, and you need everything back.
- You sent your Mac in for service and it came back wiped.
- An app or an update left your system unusable or unstable.
Notice what’s not on that list: needing to recover the version of a file from eight months ago. That’s a time-based archive, and it’s a different job…best done by Time Machine, for most users. (If you’re a developer who routinely needs old versions of files, that’s what a version-control system is for—a backup should absolutely not be that.) What every situation above needs is the same thing: a high-quality, reliable, simple, up-to-date, complete copy you can trust and restore quickly.
The job of keeping a time-based archive backup is typically done with Apple’s own Time Machine: I recommend running it as well, for those rare cases where you need something from two months ago…but also because no one was ever sad because they had too many backups.
Eggs, meet multiple baskets.
Simple to understand, simple to restore
A lot of backup grief comes from complicated storage: proprietary formats, “backup sets,” incremental-versus-differential math, and catalogs you need the original program to read. When the disaster you were preparing for finally arrives—a total drive failure—that complexity is the last thing you want between you and your data.
SuperDuper keeps your copy as files, exactly like the originals, right where you can see them:
- Restoring one file is drag-and-drop. Mount the copy, drag the file back in the Finder, done.
- Restoring everything is copying the whole thing back the other way—the same operation you already know, pointed in reverse.
No catalogs, no reconstruction, no ceremony.
Fast, because of Smart Update
A backup is only useful if it’s recent, and a copy you dread doing doesn’t get done often. That’s why Smart Update exists: after the first full copy, SuperDuper looks at what’s actually changed and copies (and removes) only what it needs to, leaving the rest untouched. The result is identical to a from-scratch copy, but it finishes in a fraction of the time—often minutes instead of hours. Fast copies are copies you’ll actually keep making.
Use it or lose it
SuperDuper’s whole approach is built so that a regular person can set up a real backup, understand exactly what it does, and feel genuinely confident about it. Your time is valuable, and a backup isn’t worth anything unless it’s current and contains the files you expect.
So let’s get started.
A note on trust
SuperDuper is careful with your data, but no software can promise perfection, and no backup strategy should rest on a single copy: just because a drive is called a “backup” doesn’t mean it can’t fail! Always keep more than one, and always work with care when the data is important. The rest of this guide will show you how.
Getting started
What you need
- A Mac running macOS 14 (Sonoma) or later. SuperDuper 4 is a native macOS app and runs on both Apple silicon and Intel Macs. It is not, and will never be, an iPhone or iPad app.
- A destination to copy to. Almost any drive macOS can mount will work—see What you can copy to, below.
- Enough room. The destination needs at least as much free space as the data you’re copying. When in doubt, bigger is better.
Note: Apple Intelligence is optional
A few conveniences—the plain-English “What Happened” summary after a copy, the automatic explanation when one fails, and automatic names for new copy jobs—use on-device Apple Intelligence and need macOS 26 (Tahoe) or later on a supported Mac. On anything earlier, SuperDuper shows a clean written summary instead. Nothing about backing up depends on it, and nothing is uploaded to the cloud or processed anywhere other than your Mac.
Installing SuperDuper!
SuperDuper 4 is distributed from shirt-pocket.com as a signed, notarized app—not through the Mac App Store. Download the disk image, open it, and drag SuperDuper to the Applications folder.
The first time you launch it, SuperDuper runs a short, guided first-run setup. It’s a handful of steps, done once, and it explains why it needs each thing as it asks. Here’s what to expect.
- Welcome. A quick hello and a plain-language overview: SuperDuper is really three cooperating pieces—the app you’re looking at, a small background helper that does the actual copying even when the app is closed, and a menu bar item that keeps an eye on copies in progress.
- Move to Applications (if needed). When you first download an app, macOS may run it from a temporary, read-only, “translocated” location. The background helper can’t live there. If SuperDuper isn’t already in Applications, it offers to move itself and relaunch—say yes.
- Enable the background helper. SuperDuper registers its helper and opens System Settings ▸ General ▸ Login Items & Extensions ▸ App Background Activity. Switch SuperDuper! on. The helper is signed by Shirt Pocket, notarized by Apple, and only ever runs the copies you ask for.
- Allow Full Disk Access (see below).
- Keep the menu bar item running. The menu bar item shows in-progress copies and delivers the notifications you ask for, without keeping the whole app open. If macOS asks permission to show notifications, allow it.
- You’re all set. A short recap, and you’re done. You won’t see setup again (unless something takes away one of the permissions).
Note
SuperDuper checks for updates automatically when you open it. You can check any time from SuperDuper! ▸ Check for Updates….
Granting Full Disk Access
To make a complete, faithful copy, SuperDuper has to be able to read every file—including the protected corners of your Home folder that macOS hides from ordinary apps (Mail, Messages, Safari data, and more). macOS gates that behind a permission called Full Disk Access.
During setup, SuperDuper opens System Settings ▸ Privacy & Security ▸ Full Disk Access for you and shows a hint to drag the SuperDuper! icon into the list (or switch it on if it’s already there). When you turn it on, SuperDuper notices within a couple of seconds and moves on. Grant it once, and you won’t be asked again.
If you skip it, SuperDuper can still run, but a copy will stop the moment it hits a file it isn’t allowed to read—because a backup that silently leaves out your Mail is worse than no backup at all.
Registering SuperDuper!
SuperDuper 4 is a paid app with a one-time license—not a subscription. You can use it unregistered for as long as you like, with no time limit, but unregistered it can only perform Erase, then copy copies. The fast, everyday features—Smart Update, scheduling, and network destinations—unlock when you register.
To register, choose SuperDuper! ▸ Register…, enter the name and serial from your license email (or just paste the whole registration link or email block), and click Register. If you’re coming from SuperDuper 3, that same window handles the upgrade—enter your SD3 serial and it’ll tell you whether your upgrade is free or discounted and let you purchase at that rate.
Note
Until you register, the About window shows an Unregistered Evaluation badge, and the copy-mode picker offers only Erase, then copy. Everything else in this guide assumes a registered copy—where a feature needs registration, we’ll say so.
What you can copy to
SuperDuper copies from a source to a destination. Both can be more than a whole drive:
- Whole volumes. The common case. APFS is best—it’s required for a bootable copy and the fastest for Smart Update. HFS+, exFAT, and FAT32 work too; for the non-APFS ones, SuperDuper shows an inline note about what they can’t preserve (for example, FAT32’s 4 GB file-size limit, no ownership, coarser timestamps).
- Folders. Drag a folder into the sidebar to copy from it, or drop one onto a copy job to copy into it—handy when a backup should live alongside other files instead of taking a whole drive. Folder destinations can’t be made bootable, and Erase, then copy isn’t offered for them. The full story is in Copying to and from folders.
- Network shares. A NAS, a file server, another Mac’s shared folder—SMB, AFP, or NFS—work as both sources and destinations, directly, with no disk-image middleman. The share doesn’t even have to be mounted when a copy runs; SuperDuper connects it on demand. Passwords, speed expectations, and limits are in Copying over the network. AFP connections in particular are quite problematic, especially as destinations—stick with SMB or NFS if you have the choice.
- Encrypted (FileVault) volumes. Handled for you. If a volume is locked, SuperDuper unlocks it from your keychain when a copy runs. (One caveat lives in Bootable backups: making a copy bootable removes the destination’s encryption, because macOS doesn’t let any app encrypt a bootable copy.)
A couple of things are deliberately not destinations: NTFS volumes (macOS can only read them, so they’re offered as sources but never destinations), and disk images (.sparseimage / .sparsebundle). If you remember juggling sparse images to back up over a network in older versions, you don’t need to anymore—network shares are now first-class. The image file itself isn’t a valid source, either—but you can always point SuperDuper at the image’s already-mounted volume, if you need to.
Caution! Give a backup its own space
A copy makes the destination match the source, so it’s always best to give a backup its own volume or its own folder, isolated from things you’re storing only there. SuperDuper always tells you, in plain language and again in a confirmation dialog, exactly what it’s about to do—read it.
A tour of the window
The SuperDuper window has two parts: a sidebar of sources on the left, and the main pane on the right.
The sidebar: your sources
Every drive (or folder) you can copy from appears under SOURCES. Each row shows the name, capacity, and format. Select a source to work with it.
- Drives that aren’t connected are dimmed (or hidden, if you’ve never configured a copy for them). Reconnect the drive and it comes back.
- A sort control at the top of the sidebar lets you choose how it’s organized. By default there’s a single section, sorted alphabetically by type. Switch to purely alphabetical if you’d rather, or turn on sections that split things into SOURCES (volumes with copy jobs), DESTINATIONS (volumes only used as copy destinations), and OTHER VOLUMES (drives that are attached but not doing anything for you yet). Any section other than sources can be collapsed to keep the list tidy.
- If a source drive is ever erased or reformatted, SuperDuper notices and shows a Re-pick banner so you can point its copy jobs at the drive that replaced it, rather than silently copying the wrong thing.
At the bottom-left of the sidebar is a small lock that authorizes unattended copying. We’ll come back to it in Scheduling.
The main pane: copy jobs
Select a source and the main pane shows the copy jobs configured for it. A copy job is the central idea in SuperDuper 4—one self-contained description of a copy: what it copies, where to, how, when, and what to do afterward.
Each copy job has a few plain-English sentences outside the What’s going to happen? section. Some words in those sentences are bold, blue, and underlined with dots—those are the parts you click to change. Click the destination to pick a different drive; click the copy mode to change how files are compared; click the schedule to set one up. Every change rewrites the sentence, so it always describes exactly what will happen. There’s no separate “settings” to reconcile against the description—the description is the settings.
A brand-new source without any jobs shows a friendly welcome and an + Add Copy Job button. Click it and you get your first blank job, ready to fill in. You can have as many copy jobs per source as you like—a nightly full backup and a weekly copy to an offsite drive can happily coexist.
Copies keep running even if you quit the app—the background helper does the work—and the menu bar item shows what’s in progress from anywhere. In the next chapter, we’ll fill in that first job and make a copy.
Making your first copy
This is the whole thing, start to finish: from a blank copy job to a finished, trustworthy backup. It takes about a minute of setup and then however long the copy itself needs.
Note
This walkthrough uses Smart Update, which needs a registered copy. Unregistered, you can still make a full backup—you’ll use Erase, then copy instead, which the Copy modes chapter explains. Everything else here is the same.
Step 1: Pick your source
In the sidebar, select the drive you want to copy from. For a full backup of your Mac, that’s your startup drive—usually Macintosh HD. The main pane switches to show that source’s copy jobs.
Step 2: Add a copy
Click + Add Copy Job (top-right of the main pane, or the button in the welcome panel). A new job appears. It already knows its source—the drive you selected—so the sentence begins:
Copy files from Macintosh HD to your selected destination…
The words your selected destination are underlined and tinted, because that’s the one thing you have to choose before anything can happen.
Step 3: Choose a destination
Click your selected destination. A small picker drops down listing the volumes you can copy to, each with its capacity, free space, and format. (Your source is deliberately absent from the list—you can’t copy a drive onto itself.)
Pick your backup drive. The sentence fills in with the drive’s real name, and the rest of the job lights up:
Copy files from Macintosh HD to Backup, using Backup - all files with Smart Update.
Those two new underlined phrases—the copy rules and the copy mode—just took sensible defaults. For a first full backup, the defaults are exactly right, and we’ll explain both in a moment.
Caution! The destination gets overwritten
A copy makes the destination match the source. Whatever is on the destination that isn’t part of your copy can be changed or removed, depending on the copy mode. It’s always best to give a backup its own drive or volume, isolated from anything you care about keeping separately. SuperDuper will always tell you, in plain language and again in a confirmation dialog, exactly what’s about to happen—read it.
Step 4: Check what’s going to happen
This is the part worth slowing down for, because it’s what makes SuperDuper trustworthy: the job already says what it will do. Read the sentence.
- “using Backup - all files”—the copy rules decide which files get copied. Backup - all files (the recommended default) makes a complete copy of the source, skipping only the temporary and system-specific files Apple recommends excluding. This is the one you want for a real backup.
- “with Smart Update”—the copy mode decides how files are compared and copied. Smart Update makes the destination identical to the source, copying what’s new or changed and removing what’s gone. On the very first copy there’s nothing there yet, so it copies everything; every copy after that is fast. (The full rundown of modes is in Copy modes.)
Below that, the job tells you what happens when the copy finishes and whether it’s scheduled—by default, “Runs when you click Copy Now,” and nothing special on completion. That’s fine for now.
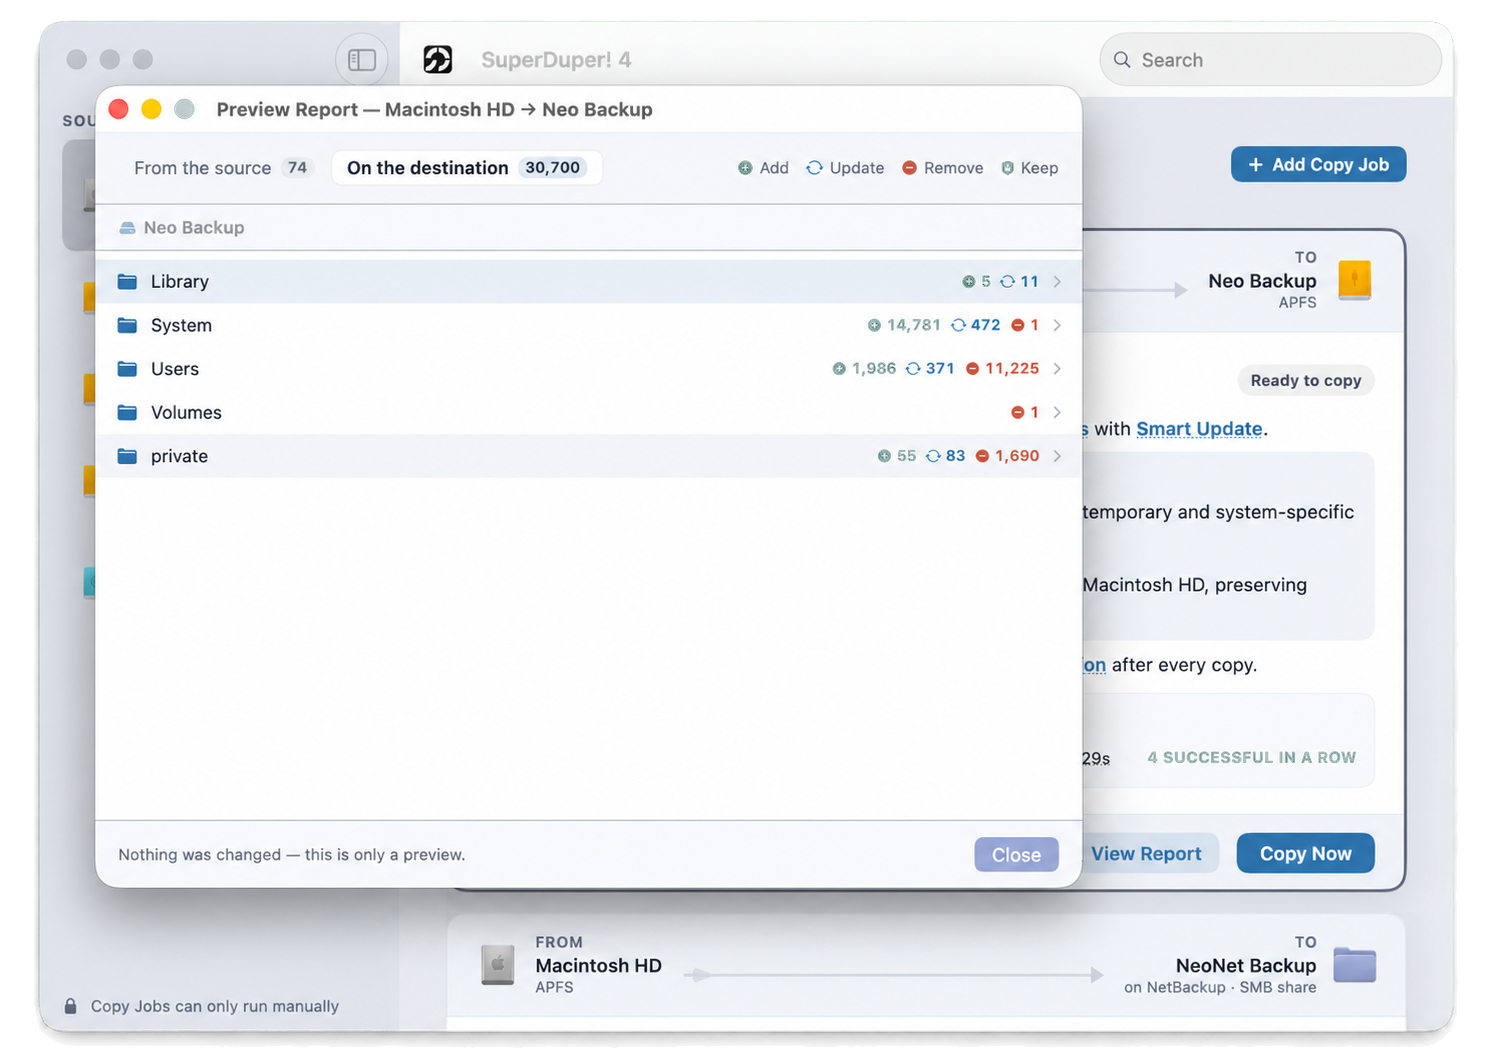
And if you’d like to see the plan before you commit to it, click Preview. SuperDuper reads the source and destination and shows what the copy would do—what gets copied, what gets removed—without touching a single file. It’s the fastest way to build trust in a brand-new copy job.
Step 5: Copy Now
Click Copy Now. Because a copy changes the destination, SuperDuper shows a confirmation that spells out the consequences in the plainest terms—for a Smart Update, that files on the destination which aren’t on the source will be deleted, and that Time Machine backups on the destination (if any) are preserved. When you’re satisfied, confirm.
Note
If you haven’t unlocked copying (the lock in the sidebar), SuperDuper asks for an administrator password before a manual copy starts. Unlock the lock and it won’t ask again. See Scheduling and automatic copies.
Step 6: Watch it run
The job turns into a live status view. SuperDuper works in phases—preparing the destination, copying files, updating the destination, finalizing—and shows you which phase it’s in, a running percentage and throughput during the file copy, and an estimated time remaining. Each phase checks off as it completes.
You don’t have to sit and watch. You can quit SuperDuper entirely and the copy keeps going—the actual copying is done by a background helper, not the window. A menu-bar item shows copies in progress whether the app is open or not. If you’ve asked for a notification on completion (see Scheduling), you’ll get one when it’s done—click it to jump straight to the copy. Come back any time and the job shows the current state.
If you need to stop, click Pause (it finishes the file it’s on, then holds, and Resume picks up where it left off) or Cancel Copy (which stops the run).
Step 7: You’re done
When a manual copy finishes, the job shows a What Happened summary: the phases all checked off, and a tidy set of stats—Time, Copied, Files, Updated, Deleted, Method, and (for a bootable copy) Bootable. On a Mac running macOS 26 (Tahoe) or later with Apple Intelligence, you’ll also get a one- or two-sentence plain-English summary of the run, generated on-device; on earlier systems you get a clean written summary instead. Click OK and the job returns to its normal state, now stamped with the date and time of its last copy.
SuperDuper keeps the last 10 runs for each copy job. A small Recent strip on the job shows each one as a pass/fail dot; click one to reopen that run’s summary, and from there its full details if you ever need them.
That’s a real backup. To bring it up to date later, you don’t set anything up again—just select the source, find the job, and click Copy Now. Thanks to Smart Update, the update takes a fraction of the time the first copy did.
And if you’d rather never have to remember to click it, that’s the next chapter but one: Scheduling and automatic copies.
Copy modes: how files are copied
Every copy job has two independent choices baked into its sentence:
- The copy rules—which files to copy (covered in its own chapter). The default, Backup - all files, copies everything Apple allows.
- The copy mode—how those files are copied and compared against what’s already on the destination. That’s this chapter.
Click the copy mode phrase in a job (Smart Update by default) and you’ll get a picker titled How files are compared, with four choices. Here’s what each one does, and when to use it.
Note: registration and where modes apply
Three of these modes—Smart Update, Copy Newer, and Copy Different—need a registered copy; unregistered, only Erase, then copy is available. And when your destination is a folder or a network share, Erase, then copy isn’t offered—you can’t erase a folder or a share the way you can a volume—so SuperDuper keeps those on Smart Update.
Smart Update—recommended
The destination is made identical to the source. New and changed files are copied; files removed from the source are also removed from the destination. Time Machine backups on the destination are preserved.
This is the one you want almost all the time. The result is exactly what you’d get by erasing the destination and copying everything fresh—a faithful mirror of the selections from the source—but SuperDuper gets there by changing only what needs changing. It copies new and modified files, and it deletes files from the destination that are no longer on the source, so the two truly match.
Because it only touches what’s different, Smart Update does in minutes what a from-scratch copy does in hours. After your first full copy, this is how you should keep a backup current.
Note: Smart Update deletes, by design
Making the destination identical to the source means removing things from the destination that aren’t on the source anymore—including a file you may have stashed there and forgotten. That’s not a bug; it’s the definition of a mirror. Keep your backup on its own volume, not mixed in with files you’re storing only there. If you need to keep something on the destination that isn’t on the source, Smart Update is the wrong mode for that drive—use Copy Newer or Copy Different instead.
One case worth calling out: Smart Update preserves old-style, non-APFS Time Machine backups already on the destination. But if the destination doesn’t already hold Time Machine backups, they’d count as “not on the source” like anything else—so don’t Smart Update onto a drive you also use for Time Machine unless that drive is where those backups came from. The job’s sentence tells you which case you’re in (“Time Machine backups are preserved,” “…overwritten,” or “…included in the copy”).
Copy Newer
Files newer on the source than on the destination are copied. Existing files on the destination that aren’t on the source are left in place.
Copy Newer adds and updates, but never deletes. A file is copied only when the source’s version is newer (more recently modified) than the one on the destination. Anything already on the destination that isn’t on the source is left completely alone.
Use it when you want to fold the source’s changes into a destination that also holds other files you want to keep.
Copy Different
Files that differ between the source and the destination (by size, modification date, or contents) are copied. Existing files on the destination that aren’t on the source are left in place.
Copy Different is like Copy Newer, but stricter about what counts as “needs copying.” Instead of asking is the source newer?, it asks is the source different at all?—by size, modification date, or contents. That catches a file that changed but kept an older date, at the cost of a little more comparison work. Like Copy Newer, it never deletes anything from the destination.
Erase, then copy—destructive
The destination is completely erased, then everything from the source is copied to it. The result is a clean, exact copy of the source.
Erase, then copy wipes the destination first, then copies. The result is pristine—there’s nothing left over from whatever was on the destination before—but it takes the most time, because everything is copied every run.
Two big reasons to reach for it:
- Bootable backups. On a Mac, the only way a third-party app can produce a genuinely bootable copy of macOS is to erase the destination and replicate the whole volume using Apple’s own copying tool. When your source is a startup drive and your destination is an eligible APFS drive, Erase, then copy is what makes a bootable copy. See Bootable backups and restoring for the full story, including the important Apple-silicon caveats.
- Starting clean. If you’ve got a damaged destination that Disk Utility can’t repair, a single Erase, then copy gives you a guaranteed-clean baseline. Switch back to Smart Update afterward and you’re fast again.
Erase means the volume, not the whole drive
“Erase” here means the destination volume—not the physical disk. If your backup drive has other volumes on it, they’re untouched. SuperDuper always tells you exactly which volume it’s about to erase, and asks you to confirm it, before it touches anything.
Which should I use?
| If you want to… | Use |
|---|---|
| Keep a backup that mirrors your source, fast | Smart Update |
| Merge changes into a drive that holds other files too | Copy Newer or Copy Different |
| Make a bootable copy of your Mac | Erase, then copy |
| Reset a volume | Erase, then copy (once), then back to Smart Update |
For a normal backup, leave it on Smart Update and don’t think about it again. The whole point of the picker is that the sentence in the job always tells you which one is selected and, in plain language, what it will do to your destination.
Copying to and from folders
Not every copy is a whole drive. Sometimes the thing worth protecting is a single folder—your Documents, a projects folder, a photo library—and sometimes the destination shouldn’t be a whole drive either, because the backup needs to live alongside other things you keep there. SuperDuper handles both, with the same copy job setup you already know.
Copying from a folder
Drag any folder from the Finder into the sidebar. It appears under the drive it lives on—a folder is always shown with its home volume, so you can tell your Documents from Documents on some other drive at a glance.
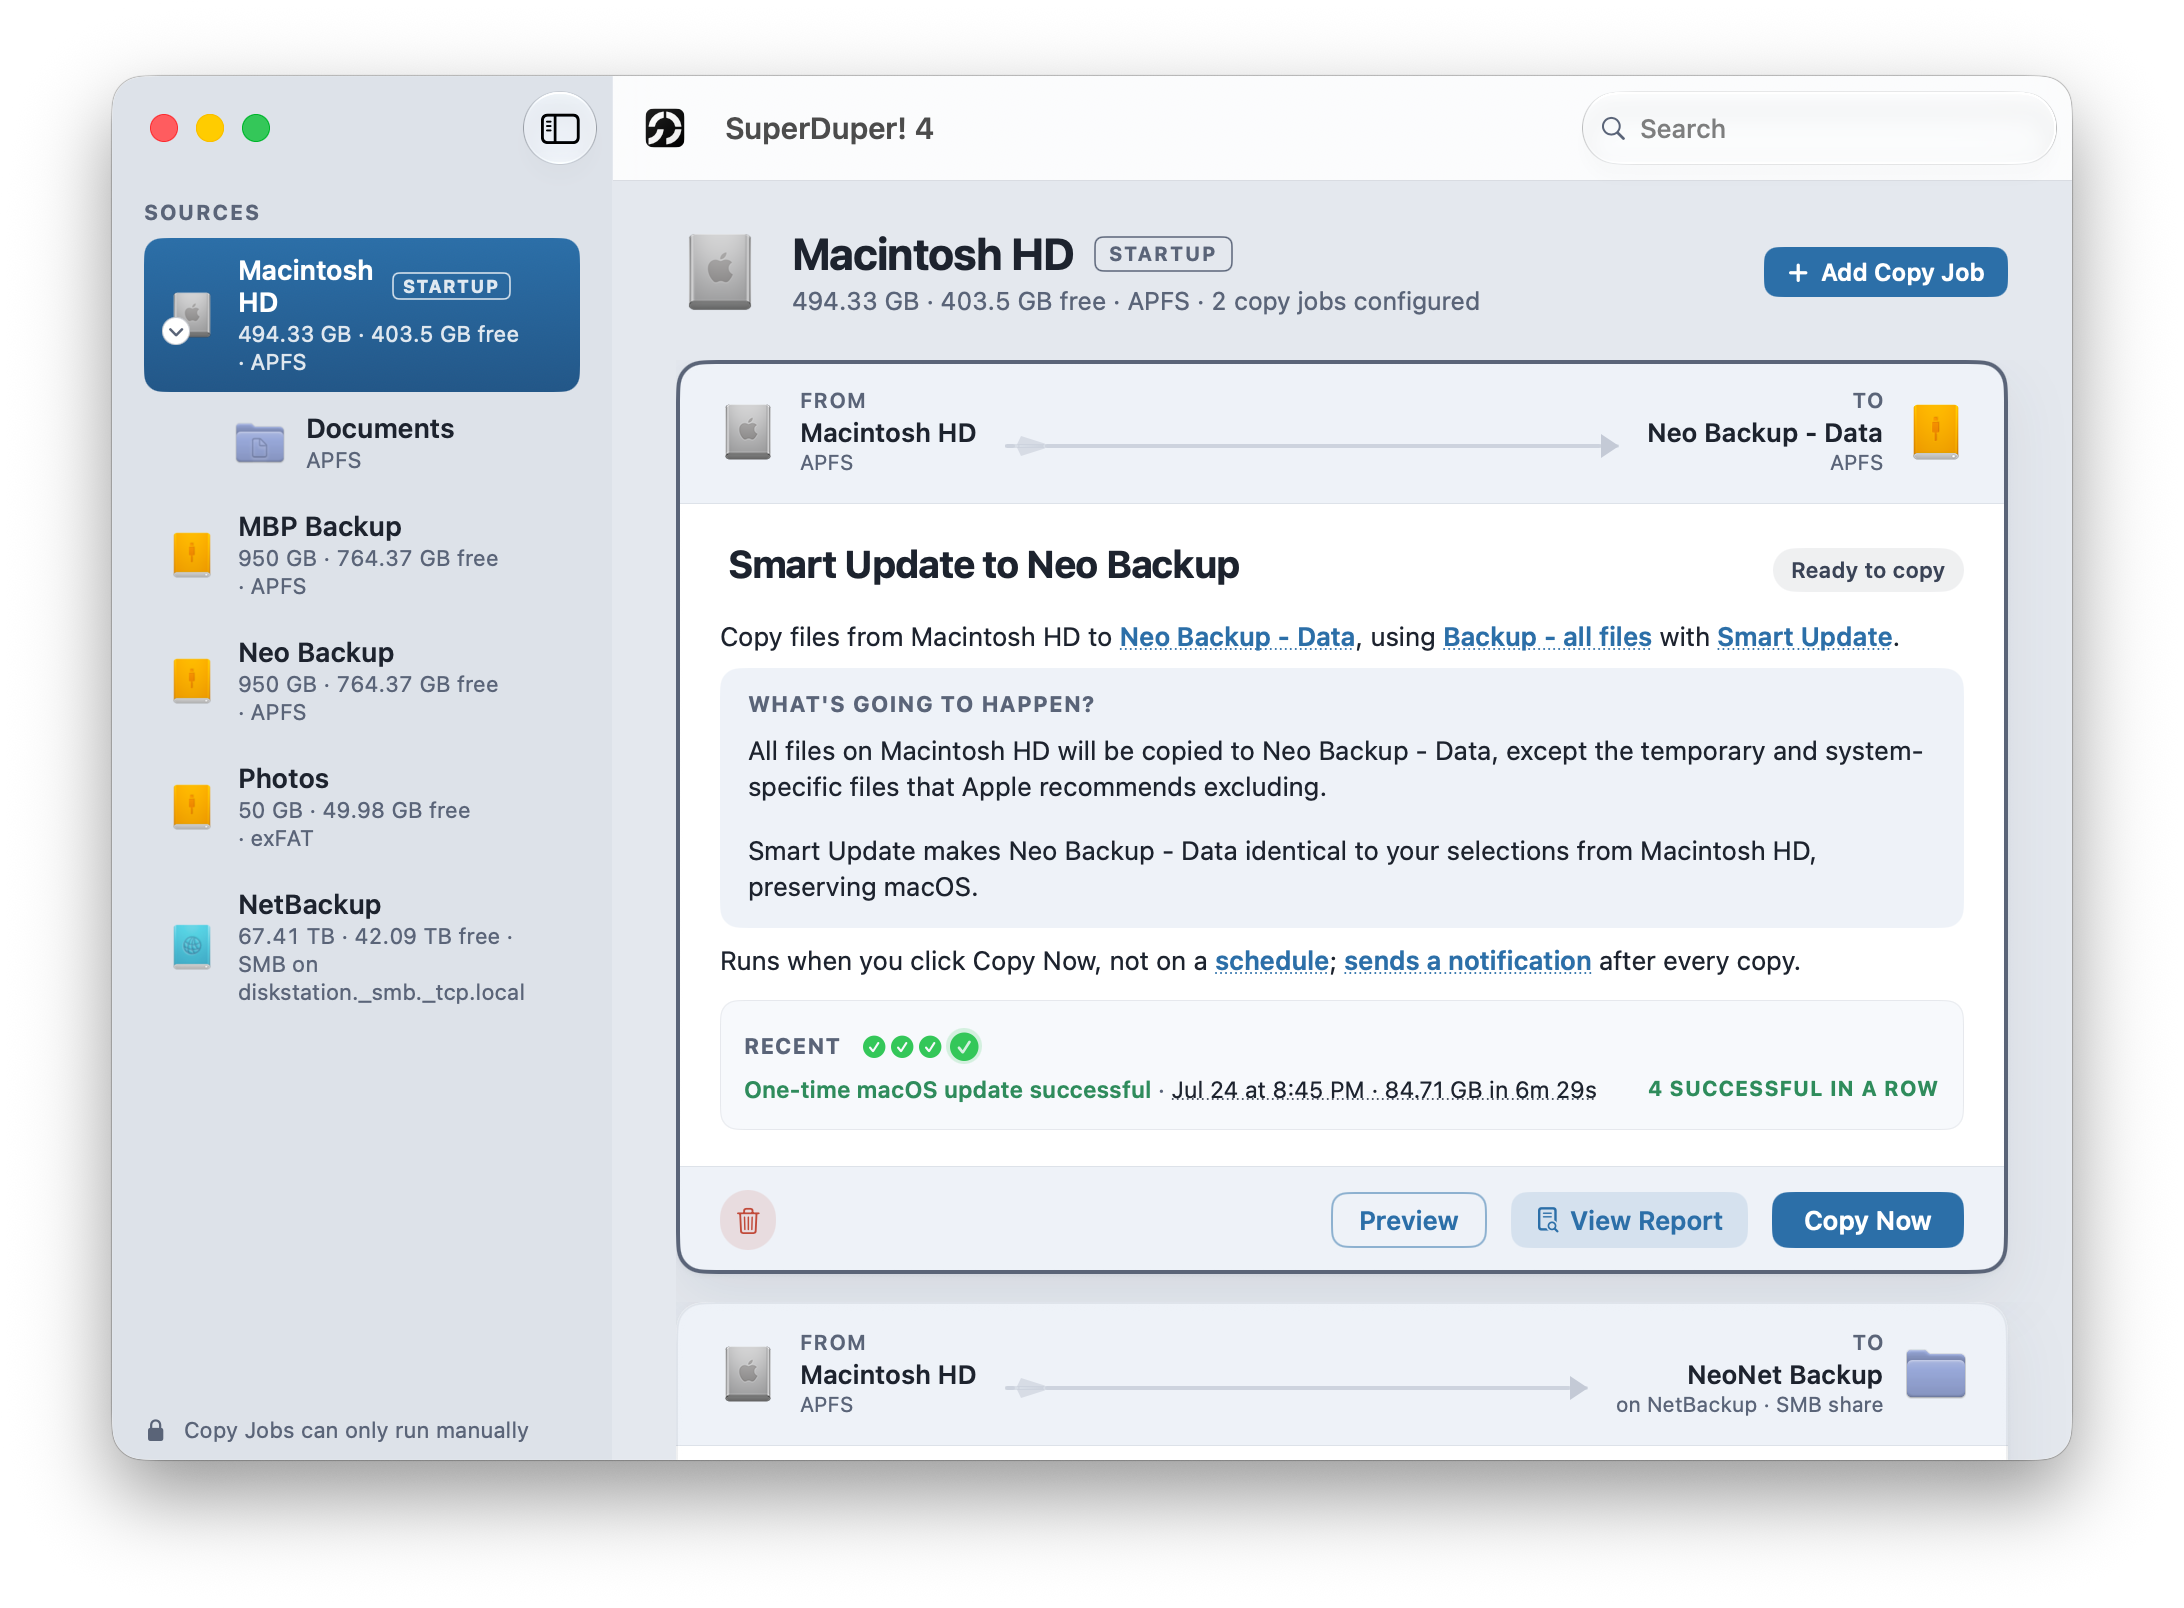
From there it works exactly like any other source: select it, click Add copy, and change the various options. The job names the folder, and the copy contains that folder’s contents—nothing above it, nothing beside it.
A few notes about folder sources:
- A folder copy can’t be a Migration Assistant source. Migration Assistant wants a full Backup - all files copy of a system drive; a folder is a subset by definition, and the job says so.
- Copy Rules still apply. “Everything in this folder except
Caches” is a perfectly good rule—see Customizing what gets copied.
Copying into a folder
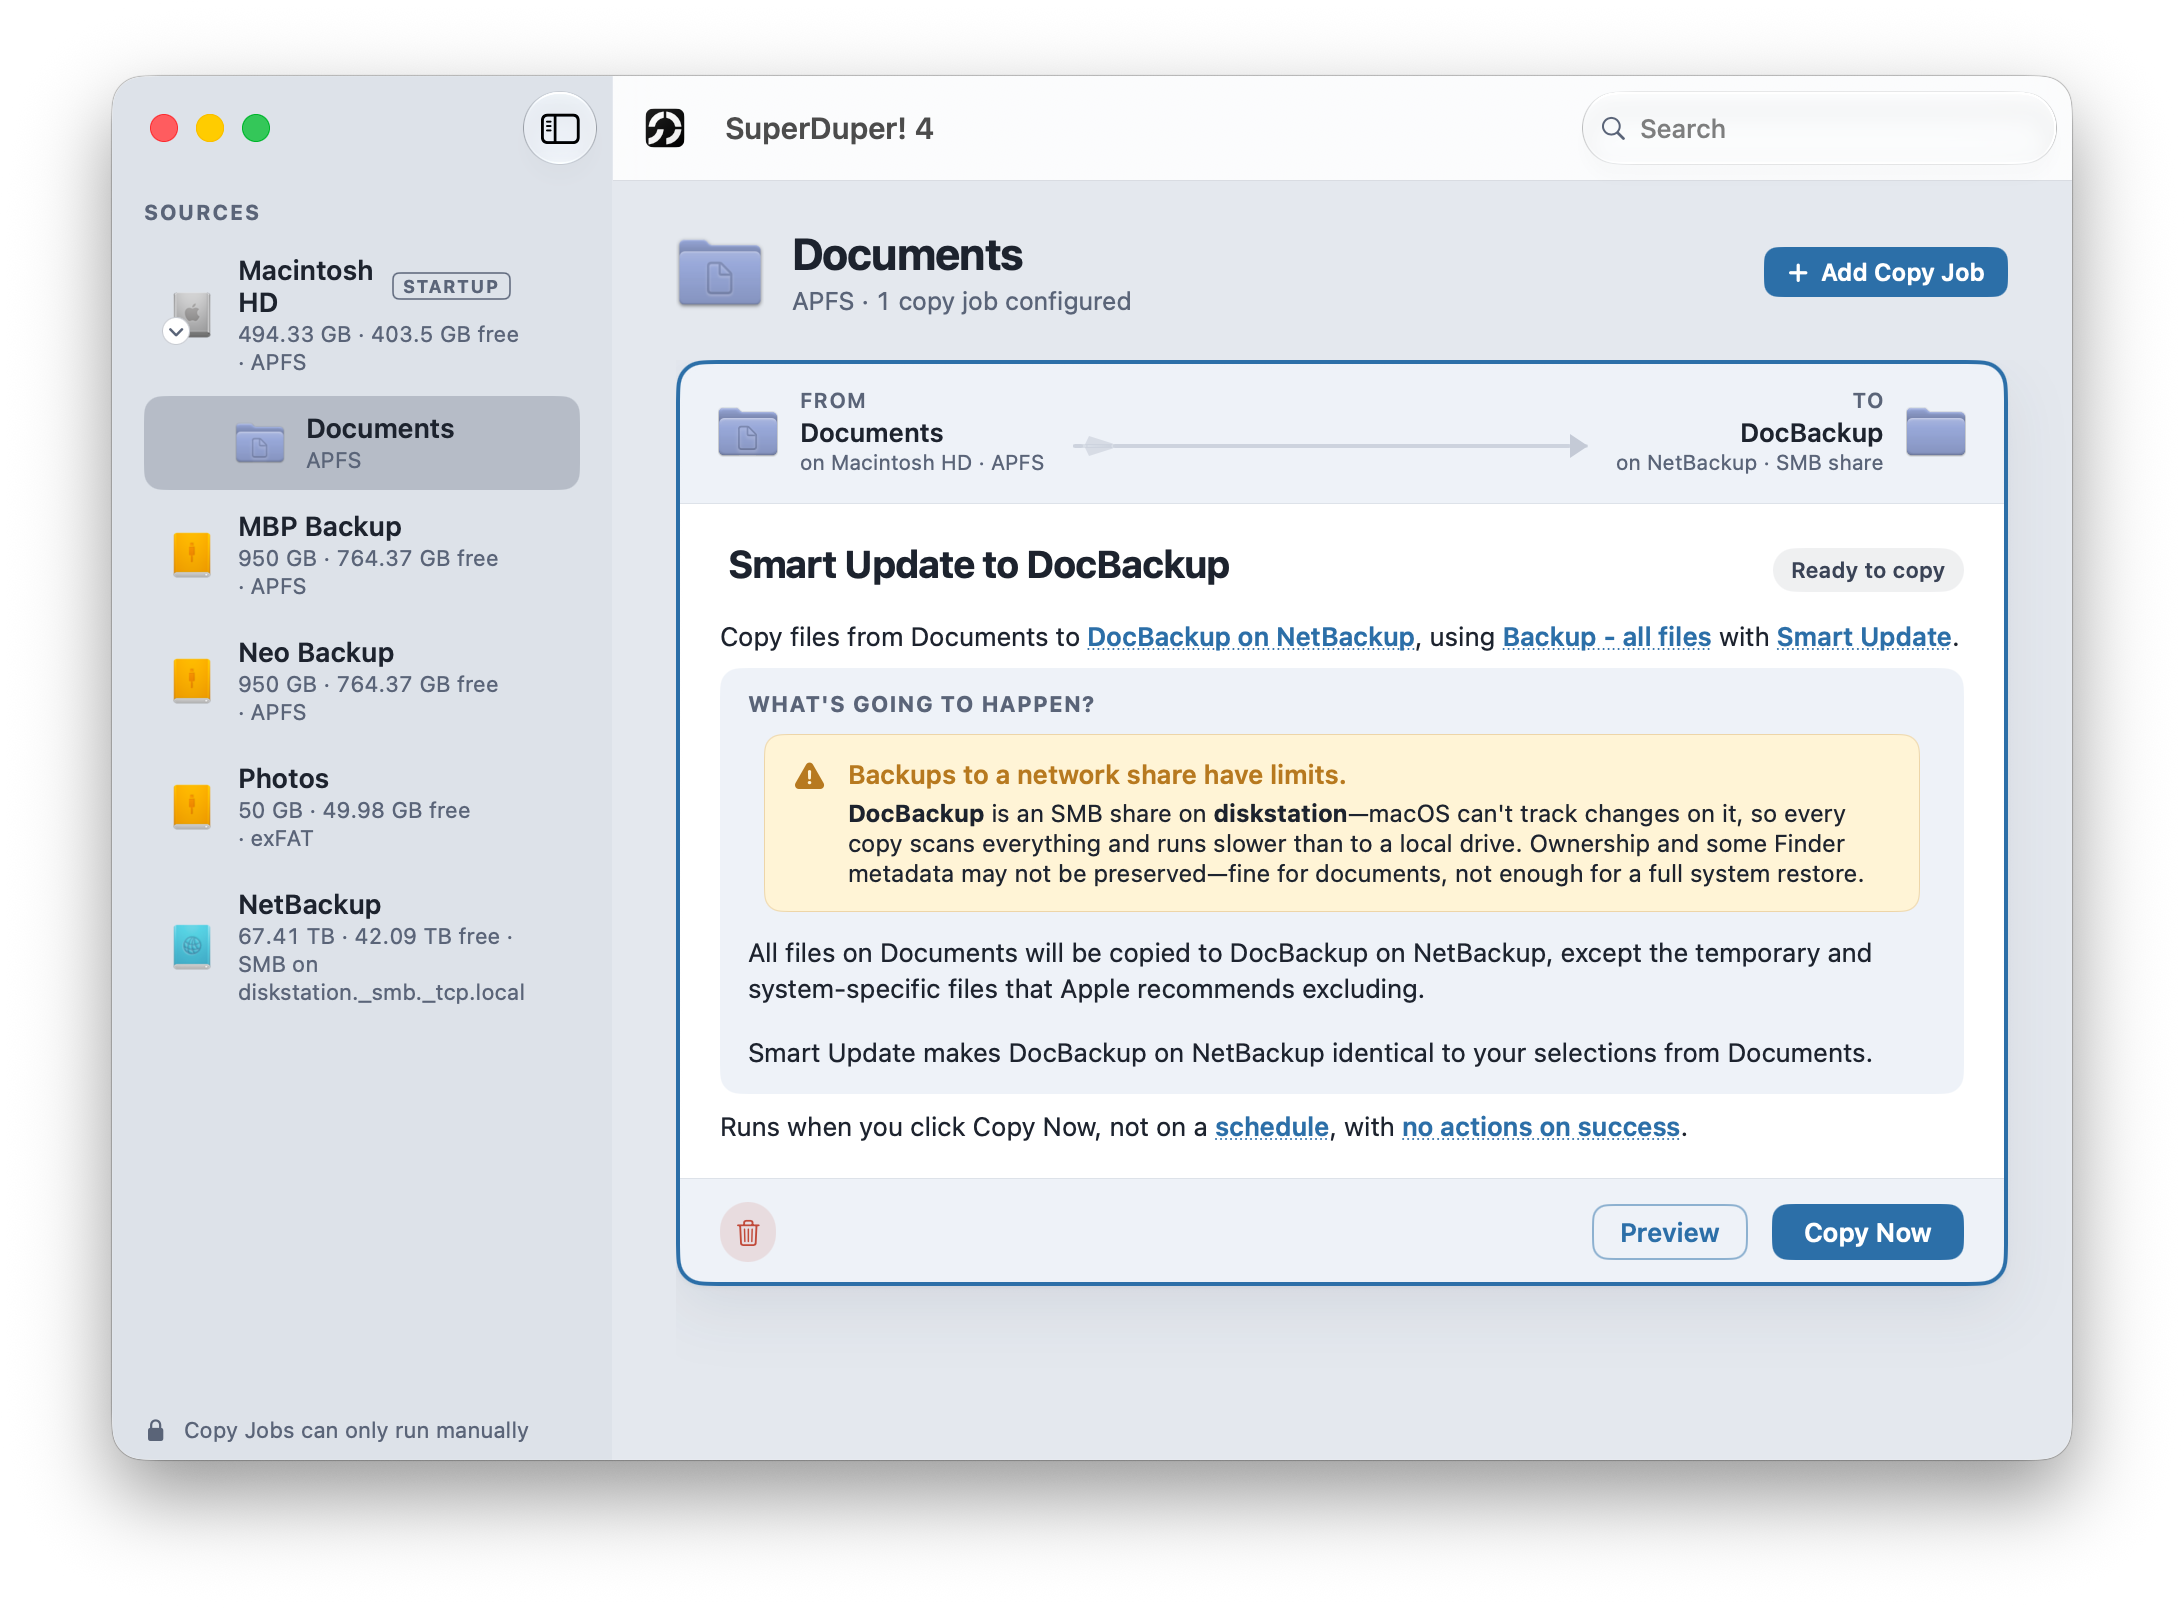
The mirror image: drag a folder from the Finder onto a copy job, and that folder becomes the destination. The sentence updates to name it, so there’s no doubt about where the files are going.
This is the right shape when a big drive is doing double duty—the backup gets its own folder, and everything else on the volume is left to its own devices. It’s also the natural shape for a network share, where you often want to copy into a folder on the share rather than claim the whole thing (more in Copying over the network).
What changes with folders (and what doesn’t)
Everything you know still holds—Smart Update makes the destination folder’s contents identical to the source, copying what changed and removing what’s gone. The important part: its reach ends at the folder’s edge. A Smart Update into a folder only ever touches that folder’s contents. The rest of the drive isn’t SuperDuper’s business, and it stays that way.
What’s off the table, and why:
- Erase, then copy isn’t offered. You can’t erase a folder the way you can a volume, so folder destinations stay on the Smart Update family.
- Bootable is out. A bootable copy is a block-for-block replica of a whole volume; a folder can’t be one, and the sentence says so plainly.
Everything else—scheduling, on-completion actions, notifications, Shortcuts, Copy Rules—works with folders exactly as it does with drives.
An example: copy projects to a shared drive, nightly
Say your work lives in ~/Projects and there’s a house file server everyone uses.
- Drag
Projectsfrom the Finder into the sidebar. It appears under your startup drive. - Select it, click Add copy, and drop the destination folder (say,
Backups/Daveon the server) onto the job. - Read the sentence—it should say it’s copying Projects into Backups/Dave, with Smart Update.
- Click the schedule and make it nightly.
That’s a real, current, self-updating backup of the thing you actually work on—without touching anything else on either machine.
Copying over the network
A NAS in the closet, a file server at the office, another Mac with a shared folder—SuperDuper copies to and from all of them directly. No disk images, no middleman: your files land on the share as files, readable by anything that can mount it. If you remember juggling sparse images to back up over a network in older versions, you can forget all of that now.
Note
Network destinations need a registered copy—see Registering SuperDuper!.
Setting one up
- Connect to the share once, the normal macOS way: in the Finder, Go ▸ Connect to Server (⌘K), enter the server’s address, and (important!) check “Remember this password in my keychain” when you log in. SuperDuper uses that saved password to connect on its own later.
- Pick it in a copy job. The mounted share shows up in the destination picker like any drive, or drag a folder on the share onto the job to copy into just that folder (usually the right move—see Copying to and from folders).
- Decide whether you want to use an image. When you select a network volume or folder as a destination, SuperDuper will ask you if you want to use an image instead of writing directly to the network drive.
In general, copies with a large number of files (such as a startup volume) should use images. If you’re just copying, say, your Documents folder, you’ll usually write directly to the network drive. - Read the sentence and go. Same jobs, same modes, same confirmation.
SMB (what nearly every NAS and modern server speaks), AFP, and NFS shares all work, as sources and as destinations.
If you’re writing directly to a volume, do not use AFP. In my testing, AFP has proven to be too unreliable for any significant copies, and has problems reppresenting even the simplest unusual structure (like symlinks).
You don’t have to keep it mounted
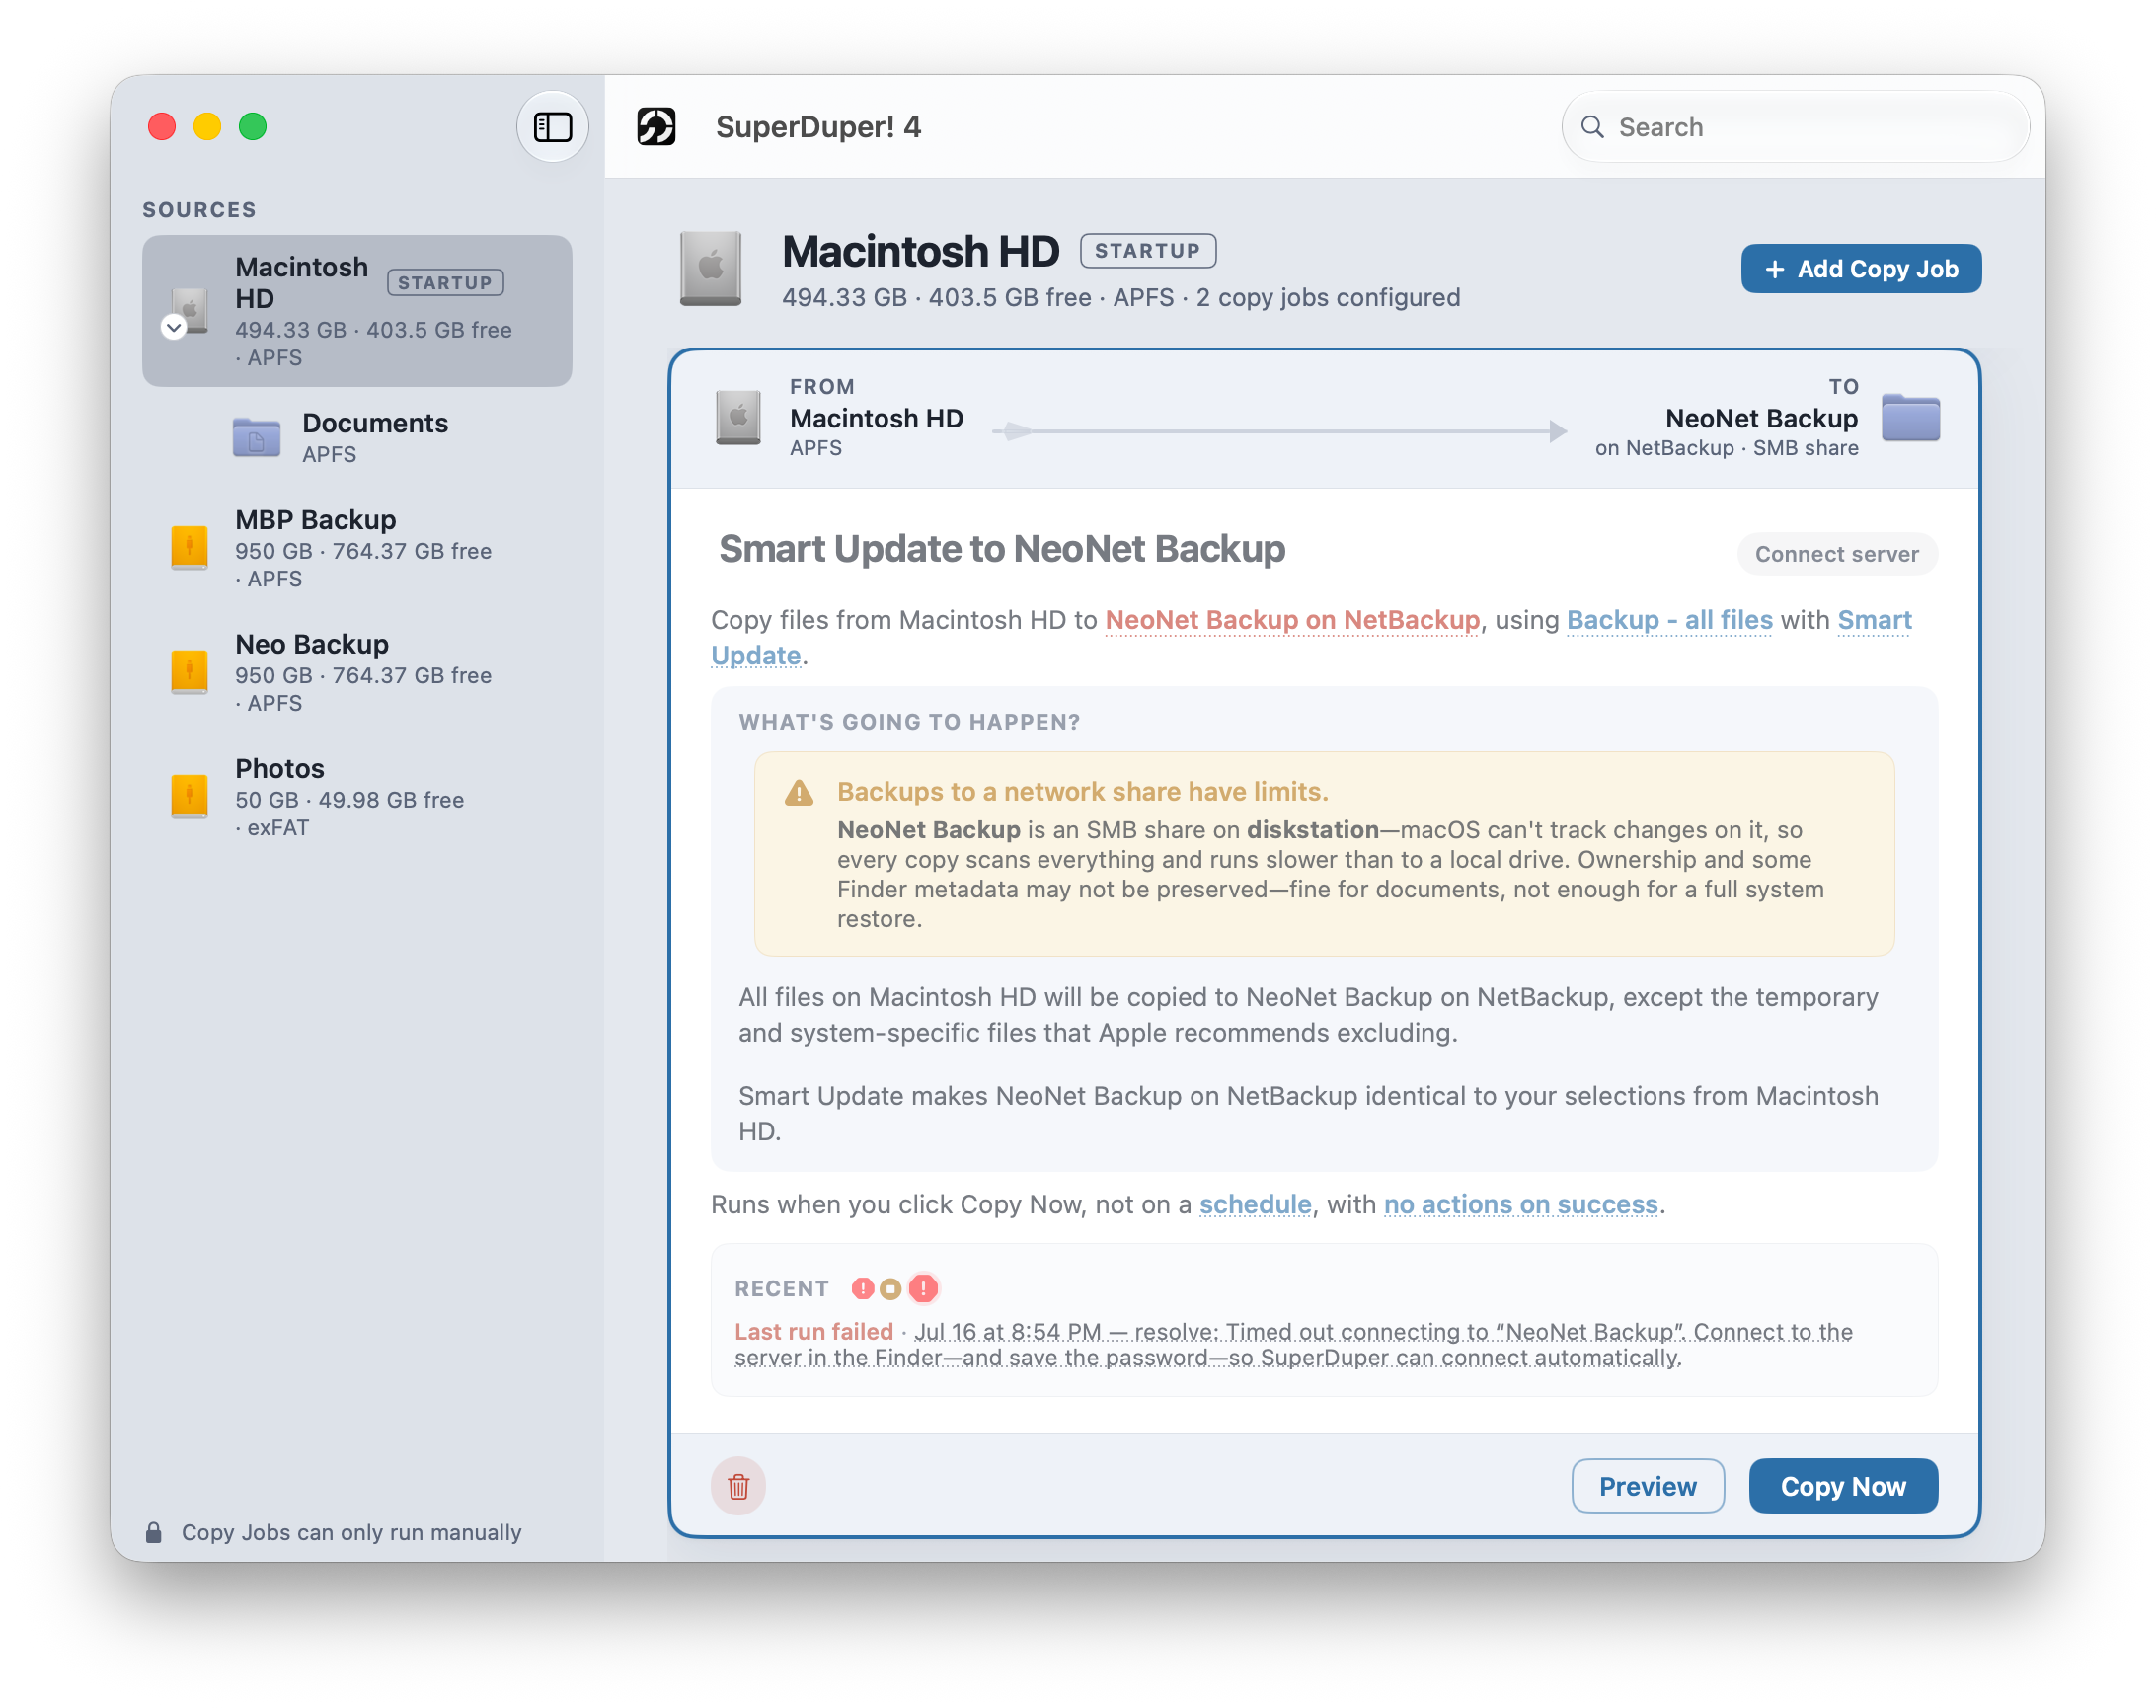
After a job is set up, the share doesn’t need to be mounted for the job to run (even if you’re copying to an image). When a copy (or a preview) starts and the share isn’t there, SuperDuper connects it on demand using the password saved in your keychain, then gets to work. A scheduled 3 a.m. copy to the NAS doesn’t need you to wake up and ⌘K…SuperDuper will take care of it.
Upsides and Downsides
A network copy is not a local copy, so it’s important to note:
- Every direct-to-network copy re-scans everything. Smart Update still copies only what changed—the copying is as smart as ever—but the finding out takes more time on a big share.
- The exception to this rule is an image. Images can ⚡️Turbo, which can speed things up quite a bit. But they’re also faster for regular copy operations, because every little bit doesn’t need to round-trip to the server.
- Lots of small files are the slow case. Every file on a network means round-trips to the server, and a million tiny files means a million of them. A folder of big files runs near the speed of your network; a folder of tiny text files does not.
In this case, you’d really want to use an image. - The first copy is, obviously, the worst one. As with everything, updates are dramatically faster, even with the re-scan.
None of this is a reason to avoid the network—a backup on the NAS is a backup that happens every night without a cable. It’s just a reason to schedule it for a time you’re not waiting on it.
The limits
- No Erase, then copy, and no bootable copies. A direct network copy can’t be erased the way a volume can, and it can’t boot a Mac. You can’t use it for migration, either, so don’t make a network copy your only copy.
- What the server’s disk can hold, it holds. The share’s filesystem lives on the server, and some server filesystems can’t represent everything a Mac one can…but we do the best we can.
- Network failures can corrupt images. The downside of images is that a network failure can corrupt its structure.
Don’t use a network backup as your only backup. They’re inherently less reliable, harder to recover from, and slower. They’re great as additional protection, but have their limitations, so keep them in mind.
When the password changes
SuperDuper connects with the password in your keychain, so when the server’s password changes, connect once in the Finder with the new password (checking “Remember this password” again), and the next copy picks it up. If a copy fails with a connection error, that’s the first thing to check—the rest of the checklist is in Troubleshooting.
Scheduling and automatic copies
A backup you have to remember to run is a backup you’ll eventually forget. The fix is to let SuperDuper run it for you—on a schedule, when a drive is connected, or both. It’s built right into the job.
Note
Scheduling needs a registered copy. Unregistered, you can still set a schedule up and save it—SuperDuper just won’t run it automatically until you register. See Getting started.
Setting a schedule
Every job has a sentence near the bottom that starts with Runs. Out of the box it reads:
Runs when you click Copy Now, not on a schedule.
Click the word schedule and the Schedule window opens. It has two independent triggers—turn on either, or both.
Run on a schedule
Turn on Run on a schedule and pick:
- On these days—Sun through Sat, in any combination. (Turning this on for the first time starts you on Monday–Friday.)
- On these weeks of the month—1st through 5th. Leave all five on for “every week”; pick specific ones for a monthly or every-other-week copy.
- At—the time of day the copy should start (11:00 PM to begin with).
As you choose, the summary at the bottom updates—“Nightly Backup will run every weeknight at 11:00 PM”—so there’s never any doubt about what you set.
Run when a drive is connected
Turn on Run when Backup is connected and SuperDuper copies whenever you plug that destination in. This is the effortless one for a drive you carry around: connect it, it copies, you unplug it and go. Combine it with a calendar schedule if you like—both can be on at once.
Click Save, and the job now describes the whole thing in plain language:
Runs when you click Copy Now, every weeknight at 11:00 PM, and when Backup is connected.
Everything about the schedule lives in that sentence. To change it, click it again.
Note: what if a scheduled copy fails?
SuperDuper doesn’t retry on a timer, and there’s no separate “on failure” setting to configure—a failure simply shows on the job (and in a notification, if you’ve asked for one). The next scheduled run picks things up again, and because Smart Update only copies what changed, a missed night costs you nothing but a little freshness. If failures repeat, the job’s What Happened? section tells you which file and why.
The lock: authorizing unattended copies
At the bottom-left of the sidebar is a lock. It authorizes copying to happen without stopping to ask for a password each time—exactly what a scheduled 3 a.m. copy needs. Unlocking it requires an administrator (Touch ID or an admin password), and it stays unlocked until you lock it again.
- Unlocked—unattended copies (scheduled, drive-connected, run from Shortcuts) run on their own.
- Locked—unattended copies are paused. They don’t fail; they just wait. The job even says so, tacking “…once copying is unlocked” onto its schedule sentence.
A manual Copy Now is never blocked by the lock—if copying is locked, SuperDuper simply asks you to authorize that one copy when you start it. For scheduled, connect-triggered, or Shortcut copies to run, the lock must be unlocked. If you’ve set up a schedule and copies aren’t happening, the lock is the first thing to check.
Note: your Mac doesn’t need to be awake or logged in
You don’t have to keep your Mac awake for a schedule, and no one needs to be signed in either. SuperDuper arms a wake with macOS shortly before each scheduled copy, and if a run is missed anyway—the Mac was shut down, say—it catches up: the copy runs at the next opportunity instead of silently skipping a night. A caught-up run is marked as such in the job’s history.
(Some individual actions naturally don’t make sense with nobody around, and those are simply skipped if there are no users logged in.)
A scheduled bootable copy has one extra requirement: macOS locks the keys Apple’s replicator needs while the Mac sleeps, so a bootable copy that fires on wake waits until you’ve unlocked the screen.
What happens when a copy finishes
Separate from when a copy runs is what to do when it’s done. Click the on completion phrase in the job and you get two independent groups.
On success—one power action plus optional cleanup, all of which fire only when a copy actually succeeds:
- Do nothing, Put the Mac to sleep, Restart the Mac, or Shut down the Mac (restart and shut down quit your apps normally, so anything unsaved can prompt you).
- Eject the destination and/or Eject the source—perfect for that connect-and-forget backup drive: the copy finishes, the drive ejects, and you can unplug it safely. (Eject options don’t appear for a folder or network destination, or for the drive you booted from.)
Always—things that happen after every copy, success or failure:
- Send a notification—a macOS notification when the copy finishes, whether it worked or not. (This is why notifications live here and not under “on success”: you usually want to hear about a failure even more than a success.)
- Run a Shortcut—hand off to a Shortcut you’ve built.
The two groups are independent: you can eject on success and notify every time; on a failure, only the notification fires.
That Run a Shortcut option is a teeny-tiny door that opens onto a very large room. macOS Shortcuts can do nearly anything—post to Slack, email you only when something fails, append a line to a running log, quit an app before the copy starts. SuperDuper runs your Shortcut around every copy—before it starts, after it finishes, and if it fails—handing it a small bundle of details about the run (which moment it is, whether the copy succeeded, the source and destination, stats, and the error log on failure) so it can do something smart in response. It’s worth its own chapter (Running a Shortcut when a copy finishes); this is just where you turn it on.
Many copies, at once or in turn
You can schedule as many copies as you like—even at the same time. You don’t have to guess how long one takes and stagger the next behind it: copies that share a destination run one after another, and independent ones run at the same time. Any number can be in flight; each job runs one copy at a time, and anything waiting shows a tidy “waiting in queue” state until its turn.
Bootable backups and restoring
This chapter covers the two things you do at the far ends of a backup’s life: making a copy you could start your Mac from, and—when the day comes—getting your data back.
A quick, honest framing first. On a modern Mac, macOS lives on a sealed, cryptographically protected system volume that only Apple’s own tools can reproduce. That changes what “bootable backup” means and how it’s made, and it means that for most people, most of the time, the fastest way back from a dead Mac is Migration Assistant, not booting from an external drive. SuperDuper supports both, and this chapter tells you which is which.
Making a bootable copy
To produce a genuinely bootable copy, SuperDuper has to erase the destination and replicate the whole volume, block for block, using Apple’s own replicator. That has consequences, and SuperDuper only offers it when the conditions are actually met.
A bootable copy is possible when all of these are true:
- The source is your startup drive (an APFS volume group containing macOS), and
- The destination is a physical APFS drive (an external SSD is strongly recommended), and
- The copy mode is Erase, then copy.
When those line up, the job shows a bootable choice right in its sentence:
Copy files from Macintosh HD to Backup with Erase, then copy. Since the result will be bootable, all files must be copied.
Click that bootable link and you get two options: Bootable (“Replicates the source block by block; the destination becomes a bootable copy—every file is included; the rules don’t apply”); and Not bootable (“Erases the destination, then copies the source according to the rules; the result is a plain volume that can’t boot the Mac”). A bootable copy is a block-level replica, so everything is copied, and no filtering is possible. Copy rules only apply to non-bootable copies.
Note: once an initial bootable copy is made, updates to that copy can be filtered. macOS is preserved, and the volume remains bootable.
If any condition isn’t met (the destination isn’t APFS or isn’t a physical drive, the mode isn’t Erase, then copy, or the destination is a folder or a network share) the bootable choice disappears and the sentence says plainly that the result won’t be bootable, and why.
Caution! A bootable copy can’t stay encrypted
If your destination is encrypted (FileVault), making it bootable removes that encryption. Apple’s replicator always copies the data as unencrypted, even if you format the destination encrypted.
SuperDuper tells you this in the Bootable option’s description before you commit. To end up with an encrypted bootable copy, make the bootable copy first, then boot from it and turn on FileVault—the one route Apple permits. (A non-bootable copy to an encrypted destination keeps its encryption normally.)
Caution! A bootable copy must be made from the drive you’re booted from
Apple’s replication only works when the source is the volume your Mac is currently running from (
/). If you try to make a bootable copy of a drive you’re not booted from, SuperDuper can’t produce a bootable result—it will tell you so, and offer to make a normal (non-bootable) file copy instead. To make a bootable copy of your Mac, run SuperDuper while booted from that Mac normally.Note: Apple silicon and external booting
Even a correctly made bootable copy is subject to Apple’s rules for starting up from external media, which are stricter on Apple silicon than they were on Intel. Treat a bootable copy as a genuine belt-and-suspenders measure—worth having when you need to get some things done before a full restore. A full recovery will involve installing the OS and selecting the full copy (bootable or not) when prompted to restore during first boot of a fresh macOS install.
When the backup’s macOS falls behind
A backup that includes macOS captures the system as of the moment it was made. Update your Mac a few times and the macOS on the backup is stale—still there, but old. SuperDuper watches for that: when the backup’s macOS has fallen behind your Mac’s, the job shows a band saying so, with an Update macOS Now button.
Click it and SuperDuper performs a one-time bootable Erase, then copy to bring the backup’s macOS current—just this once, without changing how the job normally runs (your nightly Smart Update stays a nightly Smart Update). It confirms first, because it erases.
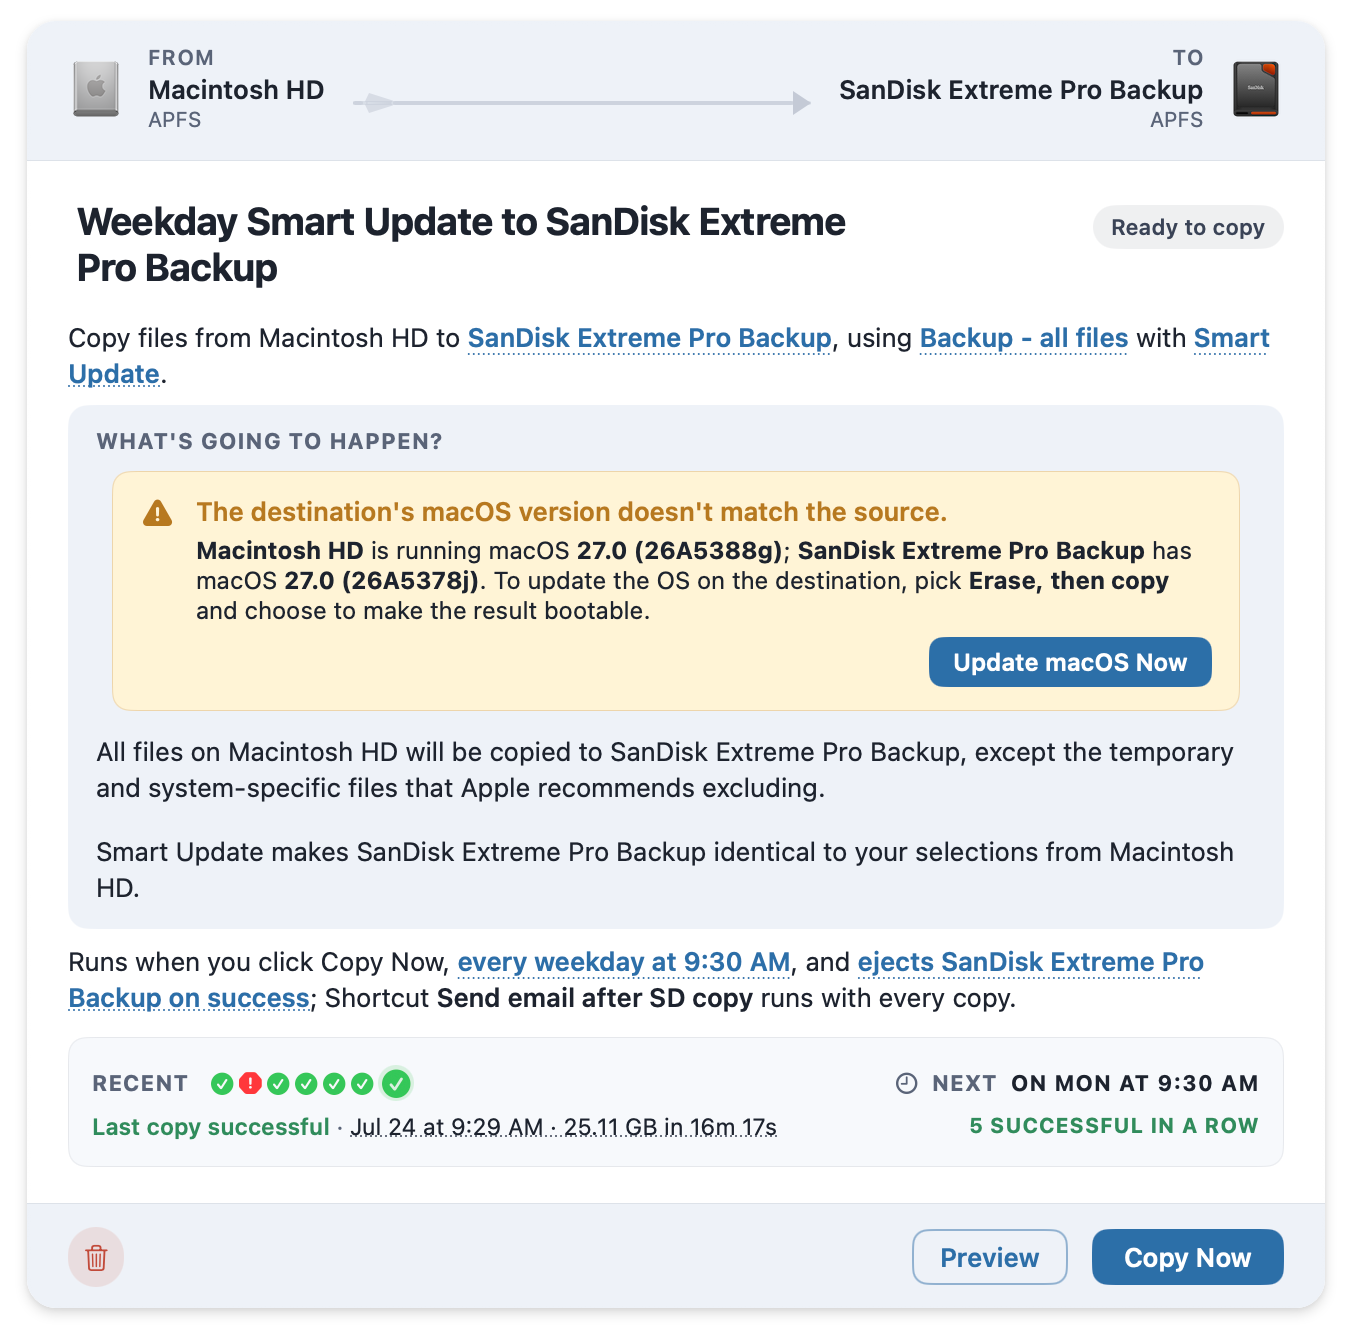
Why isn’t this automatic? Because when Apple’s replicator fails, it leaves the destination unusable—and it will fail if the Mac’s keys are locked (asleep, screen locked). Refreshing the OS on a backup is worth a deliberate click.
The copy most people actually want
Here’s the reassuring part: you don’t need a bootable copy to fully recover. A normal Backup - all files copy with Smart Update or Erase, then copy—the default you set up in Making your first copy—captures everything on the volume that matters: all home folders, all data, all applications, and all settings. It just doesn’t carry the sealed macOS system volume, so you can’t start the Mac from it.
Note: Some people are confused when they look at
/Applicationson the copy and don’t see the system apps. This is normal: Finder lies to you when it shows you the/Applicationsfolder.In truth,
/Applicationsis a synthesized combination of/System/Applicationson the System volume, where Apple’s apps are stored, and/Applicationson the Data volume, where yours are.
That’s fine, because of how you’ll use it:
- On a new or freshly erased Mac, macOS’s Migration Assistant appears during first-time setup (and lives in Applications ▸ Utilities any time after). Point it at your SuperDuper backup and it pulls everything across—accounts, apps, files, settings—onto a clean, current macOS. This is the modern “restore my whole Mac” path, and it’s the one to reach for first.
The job tells you when a copy is Migration-Assistant-ready. A full copy to a drive without its own macOS reads, in the sentence, that it won’t be bootable but can be used as the source for Migration Assistant. (A copy of only a subset of files—using rules other than Backup - all files—can’t serve as a Migration Assistant source, and the job says so.)
If your source and destination could make a bootable copy but you’re on a non-erase mode, the phrase “not be bootable” in the sentence is itself a link—click it and SuperDuper switches the job to a bootable Erase, then copy for you. So you’re never more than one click from a bootable copy when one is possible, and never nagged about it when it isn’t.
Restoring individual files
This is the everyday case, and it’s the easiest thing in the whole program. Your backup is just files, sitting on a drive in the Finder.
- Connect the backup drive (or mount the backup) so it appears in the Finder.
- Find the file or folder you want.
- Drag it back to where it belongs.
That’s all. No catalog, no special “restore” mode, no reconstructing anything. It works because SuperDuper never hid your data inside a proprietary format in the first place.
Restoring everything to a drive
When you need to put a whole backup back onto a drive—say, a replacement internal disk, or your original drive after a repair—you have two good options.
Option 1: For a regular volume, copy it back with SuperDuper!
A restore is just a copy pointed the other way. SuperDuper ships a Restore - all files rule (which is the same as Backup - all files, but does not copy HFS+ Time Machine) for exactly this:
- In SuperDuper, set the source to your backup and the destination to the drive you’re restoring onto.
- Choose the Restore - all files rule, and use Smart Update (or Erase, then copy for a guaranteed-clean result).
- Read the sentence, confirm, and Copy Now.
Option 2: Restore your startup drive
As above—on a clean install of macOS, during first boot, select the SuperDuper backup when prompted to restore (before account creation). This is usually the smoothest route for a total-Mac recovery, because it lands your data on a fresh, fully-sealed macOS without you having to think about system volumes at all.
When things go wrong, don’t panic
If a copy stops with an error, that’s SuperDuper being careful—it refuses to quietly skip a file it couldn’t read or write, because it can’t know how important that file is to you. The What Happened section on a failed copy tells you which file and why, offers to reveal it in the Finder, and (on Macs with Apple Intelligence) explains the failure in plain language with suggested next steps. Most failures are transient, but they can also be due to a full destination, or a macOS or the drive in a weird state.
Your first line of defense is the silliest: simply restart your Mac and try again. That can work wonders!
If you’re ever stuck, Contact Support right from the failed job sends us the details we need to help.
There’s a dedicated Troubleshooting chapter later in this guide that goes deeper. But the headline is the one this whole program is built around: keep a current copy, understand what it does, and getting your Mac back is a calm afternoon instead of a bad week.
Registering SuperDuper!
SuperDuper 4 is a paid app with a one-time license—buy it once, and it’s yours. There’s no subscription and no clock: you can run it unregistered for as long as you like. The catch is that unregistered, SuperDuper can only perform Erase, then copy copies. Registering unlocks the features that make it worth using every day—Smart Update, scheduling, and network destinations among them.
Why register? Registration gives you additional features, yes. But it also tells me that you find SuperDuper valuable. (Plus, its modest cost helps keeps the lights on here at Shirt Pocket HQ, for which you have my thanks.)
What “unregistered” can and can’t do
| Unregistered | Registered | |
|---|---|---|
| Erase, then copy (including bootable copies) | ✓ | ✓ |
| Smart Update, Copy Newer, Copy Different | — | ✓ |
| Scheduled and drive-connected copies | Can be saved, won’t run | ✓ |
| Shortcut support | — | ✓ |
| Non-HFS+/APFS destinations | — | ✓ |
| Network-share destinations | — | ✓ |
| Background copies (without SuperDuper running) | — | ✓ |
| Restore from a backup | ✓ | ✓ |
Nothing expires—you can evaluate SuperDuper as long as you want by making full, bootable Erase-then-copy backups. When you register, everything unlocks immediately, on this Mac.
The About window (SuperDuper! ▸ About SuperDuper!) shows an Unregistered Evaluation badge until you register, with a link straight to the registration panel.
Registering
Choose SuperDuper! ▸ Register…. You’ll see the Register SuperDuper! panel, with two fields:
- Registered to—your name, exactly as it appears in your license email.
- Serial number—the serial from that email (it looks like
SD4-XXXXX-XXXXX-…).
You have three manual ways to fill them in:
- Type them into the two fields.
- Paste the whole thing. Copy the “Registered to / Serial number” block from your email (or the registration link) and press ⌘V, or click Paste. SuperDuper pulls the name and serial out and fills both fields for you.
- Drag the registration link or the license text onto the panel.
Click Register. SuperDuper verifies the license and, on success, shows “SuperDuper! is registered—Thank you! Every feature is unlocked on this Mac.” Click Done, and every mode and feature is available immediately.
Note
If your license email came with a registration link, clicking it launches SuperDuper and fills the panel in for you—you just click Register. Which is way easier, and much less error prone. Choose wisely!
Upgrading from SuperDuper! 3
If you own SuperDuper 3, you can open Register… and enter your existing name and serial the same way (we’ll automatically find it for you if it’s already on your Mac). SuperDuper recognizes a version-3 license and walks you through the upgrade—including whether your upgrade is free or discounted—and on to checkout if there’s anything to pay. When you’ve completed the purchase, you’ll get a version-4 license by email; paste it into the same panel to finish.
Lost your license?
Serial numbers have a way of disappearing into old email. If you can’t find yours, click Lost your license? in the registration panel, enter the email address you purchased with, and click Send License. If that address has a SuperDuper 4 license, we’ll email it to you—check your inbox (and your junk folder), then paste the license back into the panel to register.
For privacy, the confirmation is deliberately vague (“if that address has a license, it’s on its way”)—the only place your license actually appears is your own inbox, so no one can fish for whether an address is registered.
If registration stops sticking
Occasionally macOS quarantines the license file SuperDuper saved—after a big system update, for instance—and SuperDuper quietly reverts to unregistered, which can make scheduled copies stop running. If that happens, the registration panel tells you so and asks you to re-enter your name and serial exactly as they appear in your license email. Do that once and you’re back to normal. (Keeping that license email—or the registration link—somewhere findable makes this a ten-second fix.)
Customizing what gets copied: Copy Rules
Most people never need this chapter, and that’s by design. The built-in Backup - all files copies everything that matters, and that’s the right choice for a real backup. But sometimes you want to be more selective—leave a giant Movies folder out of a copy to a small drive, back up only your Documents, skip caches. That’s what Copy Rules are for.
A Copy Rule is just a saved answer to the question “which files?” You never write code. You build a rule by pointing at files and folders and saying copy this, skip that—and, when a pattern repeats, by describing it in a sentence SuperDuper turns into a rule for you. Your rules live alongside the built-in ones in the What to copy list, ready to pick like any other.
Note: don’t edit the built-ins
The rules SuperDuper ships with are read-only. When you want to change what’s copied, build on one instead of altering it—include it in a new rule and add your exceptions. That way you keep getting improvements to the built-ins in future updates, and your customization rides safely on top.
Opening the editor
In a copy job, click the what-to-copy link in the sentence (it reads Backup - all files by default). The picker lists every available rule. At the bottom, click Add Rule to build a new one—or click Edit next to one of your own rules to change it. (Built-ins have no Edit; they’re read-only.)
The editor opens pointed at the real drives this copy job uses, so the files you see are the actual files you’d be copying.
The two sides of a rule
At the top of the editor is a switch with two sides:
- From the source—pick what to copy. This is the common one: which files leave the source.
- On the destination—pick what to keep. This protects specific files already on the destination from being removed by a Smart Update. Most rules never need this side.
Where a rule starts
On the left is Starts with, the baseline your rule builds on:
- All files—”Everything on the source, minus the rules below.” Start here when you want almost everything and just need to carve a few things out.
- No files—”Nothing, except what the rules below add back.” Start here when you want only a few specific things.
Under Then these rules, you can layer in existing rules as building blocks—including a built-in like Backup - all files—with the + button. Each rule “layers onto the one above,” and you can drag them to reorder; when two rules touch the same file, the lower one wins. This is how you say “everything Backup - all files copies, except…”: include it, then add your exceptions.
Copy, Skip, Optional
The main area is a familiar file tree. Click any file or folder to set what happens to it:
- Copy—include it (the default for everything under “All files”).
- Skip—leave it and its contents out entirely.
- Optional—copy it if it lets you, and don’t treat a failure to do so—say, a locked file or a permissions snag—as an error.
Set one item and you’ll see its pill change; the rule remembers it under Your changes, and you can remove that override any time to send the item back to whatever the rules above it would do.
Making a rule from a pattern
Setting files one at a time is fine for a folder or two, but when the same kind of thing appears all over—every Caches folder, every .tmp file—describe it once. Right-click an item (or use Make a rule…) and the builder appears. You fill in a sentence:
- Do what—Skip, Optional, or Copy.
- To what—SuperDuper offers plain-English options based on what you picked, such as all Disk Image files, files starting with “installer”, everything in “Downloads”, or every folder named “Caches”.
- Where—the scope: Top level, In “Library”, In “Library” and below, or Anywhere (matches at any depth).
As you build it, a preview card shows the plain phrase (“skip everything in ‘Movies’”), the underlying pattern it matches, and a live count of matches in the files you’ve browsed so far. Click Add Rule and it joins Rules you made in the rail—and, because it’s a pattern, it keeps matching new files that fit it in the future.
For power users
Hold Option while choosing “To what” and you get an advanced rule—type the pattern, a field for a volume-relative wildcard pattern. The wildcards are the standard Unix kind:
*matches within a single path segment,**spans any depth, and?and[…]match a single character or a set. SoLibrary/**/Cachesmatches aCachesfolder at any depth underLibrary. If globbing isn’t your thing, ignore this entirely—the sentence builder covers almost everything. But nerds: when you know, you know. Nerd away.
Protecting files on the destination (Keep)
Switch to On the destination when you want a Smart Update to leave something alone on the backup drive. Click a destination file and choose:
- Keep—never remove or overwrite it. SuperDuper won’t touch it, ever.
- Keep—unless it’s being copied from the source. Preserve it until the source starts carrying a file in that spot, at which point the copy takes over.
Everything else on the destination behaves normally: files that match the source are synced, and files that exist only on the destination are removed to keep the mirror faithful (that’s Smart Update doing its job). The Keep directives are your way of carving out exceptions.
Describing and saving your rule
At the bottom, What’s going to happen? is your rule’s own description—the sentence that will appear in the job when someone picks this rule. Write it in plain language; you can use (source) and (target), which fill in the real drive names at runtime.
Give the rule a name at the top (click to rename), and click Save. Rules are saved to your own library at ~/Library/Application Support/SuperDuper!/Rules/, so they survive updates and never collide with the built-ins. The Save button’s menu also lets you Rename…, Duplicate, Reveal in Finder, or Delete a rule.
If you don’t want a rule to show up in the What to copy list on its own—because it’s only meant to be included by other rules as a building block—turn off Let people choose this Copy Rule in the “What to copy” list.
That’s the whole editor. Once your rule is saved, it’s just another choice in the job’s what-to-copy picker—select it, and the sentence updates to describe what your rule does.
A real-world example: everything except one big folder
Say you’re copying to a drive that’s a little too small, and the culprit is your Movies folder.
- In the job, click Backup - all files → Add Rule.
- Name it something like Backup, no Movies. Leave the side on From the source and the base on All files.
- In the tree, find your Movies folder, click its pill, and choose Skip—or, to catch it wherever it lives, right-click it, choose Make a rule…, build “skip everything in ‘Movies’”, and Add Rule.
- The Movies folder now shows a Skip pill. Everything else is still copied.
- Write a description if you like, click Save, and pick your new rule in the job.
From now on, that copy job copies everything Backup - all files would—minus your movies.
Troubleshooting
When things go wrong, don’t panic
First, the important thing: don’t panic. A failed copy is not a lost backup. SuperDuper is deliberately conservative—it stops the moment it hits an error rather than pressing on, because it can’t know how important the file it just stumbled on is to you, and a backup that quietly skips things is worse than one that stops and tells you. So a stop is SuperDuper doing its job, not breaking.
And because Smart Update only ever copies what changed, the fix for most failures is simply to run the copy again. Whatever transient thing tripped it—a file an app had open for a second, a drive that wasn’t quite ready—is usually gone the next time, and SuperDuper picks up right where it left off.
What a failure looks like
When a copy fails, the job turns to a What Happened? face (red, with a question mark—a successful copy gets “What Happened:” with a colon). It tells you three things:
- Which step, and which file, stopped the copy—and, when it’s a specific file, an Open in Finder so you can go look at it.
- A plain-English explanation of what went wrong and what to try—usually one to three concrete next steps.
- On a Mac running macOS 26 (Tahoe) or later with Apple Intelligence, that explanation is written on-device for your exact situation; on other Macs, SuperDuper’s own built-in analysis says the same kind of thing. Either way, the copy log never leaves your Mac.
The phase list stays on screen so you can see exactly how far it got before it stopped.
Common failures, and what to do
SuperDuper recognizes the usual suspects and tells you what each one means. Here are the ones you’re most likely to see.
The destination ran out of space
The most common one. If the destination is genuinely too small, you’ll need a bigger drive—but often it’s a macOS quirk where system-managed space looks full when it isn’t. The fix SuperDuper suggests: do a single Erase, then copy, which clears that space and lets the copy finish; then switch back to Smart Update and you’re fast again.
The drive disconnected mid-copy
If the source or destination drops off the bus while copying—or a different volume appears where it had been—SuperDuper stops immediately rather than risk writing to the wrong drive. Reconnect it, reseat the cable, try a different port, and run again. If a drive keeps dropping out, that’s the cable, the enclosure, or the drive itself—worth chasing down, because a backup is only as reliable as its connection.
Read/write (I/O) errors
A single I/O error can be a loose cable or one bad file. Repeated I/O errors usually mean the drive itself is starting to fail—which matters enormously for a backup. Reseat the cable and try another port first; if they keep coming, run Disk Utility’s First Aid on the drive, and replace it if you can’t clear them. A backup is only as trustworthy as the drive it lives on.
A busy or locked file
Sometimes another app is actively using a file—Mail’s index, a browser cache, an anti-virus scanner reading everything in real time, Spotlight indexing the destination. SuperDuper may stall on it or be unable to get exclusive use of the drive. Quit the app that’s likely using it (or the anti-virus’s real-time scanning), close Finder windows on the destination, and run again. If it stalls on the same item every time, exclude that item with a Copy Rule.
Files macOS wouldn’t let go of
Cloud- and system-managed folders—iCloud Drive’s storage, some caches—sometimes can’t be removed from the backup even after they’re gone from the source. A restart usually frees them. If it’s a folder you don’t need on the backup anyway, exclude it with a Copy Rule; otherwise, delete it on the backup in the Finder and run the copy again.
A permission block, or Full Disk Access
If macOS briefly blocks access to some files—usually temporary locking on system caches—running the copy again typically clears it. But if it keeps stopping on the same kind of file, make sure SuperDuper still has Full Disk Access in System Settings ▸ Privacy & Security (see Getting started).
An encrypted drive that isn’t unlocked
If a destination is encrypted and locked, unlock it (click it in the Finder sidebar and enter its password), then run again. To let scheduled copies unlock it on their own, run the copy once while you’re logged in and let SuperDuper save the password to your keychain.
A network share that wouldn’t connect
If a copy to (or from) a NAS or file server stops because the share couldn’t be reached, check the basics first: the server is on, the Mac can see the network, and the share’s password hasn’t changed. SuperDuper connects shares on demand using the password saved in your keychain—if the server’s password changed, connect once in the Finder (saving the new password to your keychain) and run again. The full story is in Copying over the network.
“This copy actually finished”
Occasionally a momentary glitch as a copy wraps up shows a failure even though the log shows a clean finish. SuperDuper will tell you when it thinks that’s what happened. If you’re unsure, run it again—it most likely completed.
Digging deeper: the error report
Every failure has a full report behind it. Click View Error Details (or open a past run from the job’s Recent strip) and you get the complete picture:
- What happened—the same explanation and next steps, up top.
- This run—outcome, reason, duration, and how much was copied.
- Job and Environment—the source, destination, copy rule and mode, and your SuperDuper version, Mac model, and macOS version.
- Logs—the full copy log, the surrounding system log, and the helper’s log, each expandable and selectable so you can read or copy them.
The complete diagnostic for each run is also saved on disk at /Library/Logs/SuperDuper 4/, so it’s there if you ever need it.
When you’re stuck: Contact Support
We’re here to help, and getting us the right information is one click. From a failed copy (or its error report), click Contact Support. You’ll get a short form:
- Subject is filled in for you (the failure type and the copy’s name).
- Description—tell us what you expected, what happened, and what led up to it.
- Your email—pre-filled from your Contacts “Me” card; change it if you’d like us to reply elsewhere.
SuperDuper attaches the diagnostic details—information about the copy, the state of your Mac, and the connected drives. No personal files are uploaded. Click Send to Shirt Pocket, and you’ll get a case number to reference. Most cases get a first response within one business day.
“The destination drive has changed”
Sometimes, instead of a failure, you’ll see a yellow band on a job reading The destination drive has changed—for example, “‘Backup’ used to be 1 TB—it’s now 500 GB,” or “…used to be APFS—it’s now HFS+,” or “…is on a different physical drive than when you set it up.”
This is SuperDuper protecting you: the drive at that spot isn’t the one this copy job was pointed at, and copying to the wrong drive is exactly the mistake worth catching. You have two choices:
- Cancel—leave the job alone until you sort out which drive is which.
- Relink—tell SuperDuper “yes, this new drive is the destination now,” and carry on.
If you meant to swap in a new backup drive, Relink and continue. If you didn’t expect the drive to be different, stop and check before you copy.
A short checklist
When a copy fails and you want to fix it fast, in order:
- Run it again. Most failures are transient; Smart Update resumes cleanly.
- Restart your Mac and try once more—this clears busy files and stuck folders.
- Check the connection—reseat the cable, try another port, and make sure the drive is steady.
- Free up space, or do one Erase, then copy to reset a confused destination.
- Run Disk Utility’s First Aid on the source and destination if errors repeat.
- Still stuck? Contact Support—that’s what we’re here for.
Running a Shortcut when a copy finishes
There’s only so much SuperDuper can do at the end of a copy. We can put the Mac to sleep, eject the destination, send a notification—useful things, all of them (they’re the on completion actions from Scheduling and automatic copies). But what if you want a message posted to your Slack channel when an important backup finishes? Or an email, but only when something fails, so you can stay out of your own way the rest of the time? Or a line written to a spreadsheet you keep of every copy?
We can’t possibly build all of that in. But macOS includes Shortcuts, which can do nearly anything. So in SuperDuper 4, you can pick any Shortcut you’ve built, and we’ll run it around every copy: once before it starts, once after it finishes, or—if it comes to that—when it fails. A phase value in the data we hand over tells your Shortcut which of those moments it’s in, so it can act on the ones it cares about and ignore the rest. Success or failure, every time. Your Shortcut decides what to do with the news.
Picking a Shortcut
In any copy job, there’s a sentence with a link that reads on completion. Click it, and a popover appears with two sections.
The top section, On success, is what you’re used to: sleep, restart, shut down, eject. These only fire when a copy actually succeeds.
In the Always section, you can pick a Shortcut and we’ll run it every time this copy runs—success or failure (and once before it even starts; see When your Shortcut runs). (You can also pick Send a notification here, since a notification is just as useful—probably more—when something goes wrong as when it doesn’t.)
Note
The two sections are independent. You can pick a power action and a Shortcut. On success, both fire. On failure, only the Shortcut does.
We provide one Shortcut for you: Send email after SD copy. If you pick that, we’ll import it into Shortcuts and collect your email from your Contacts Me card.1
We also provide one Shortcut template: SuperDuper Shortcut Template. This has all the sections described below, so you can just fill in the various actions you want to take.
What your Shortcut starts with
We don’t just say “go.” When SuperDuper hands off to your Shortcut, it also gives it a small dictionary describing what happened. That’s the whole point—it’s what lets your Shortcut do something smart in response, instead of blindly running the same actions every time.
After a successful copy, the dictionary looks like this:
| Dictionary key | Value |
|---|---|
| mode: | run |
| phase: | after |
| copy_job_id: | B3A8E2D1-… |
| copy_job_name: | Nightly Backup |
| run_id: | F1C5E9A7-… |
| source_name: | Macintosh HD |
| destination_name: | LaCie Backup |
| copy_mode: | smartUpdate |
| succeeded: | true |
| timestamp_unix_seconds: | 1747938200 |
After a failure, two extra entries show up: error_reason (a short summary) and error_log (the tail end of what you’d see in the copy job’s failed face).
Most fields are self-explanatory. A few notes: copy_job_id is stable even if you rename the copy job, so it’s the right thing to branch on if a single Shortcut handles several copies. run_id changes every time and is mainly useful if you’re keeping a log. copy_mode is one of smartUpdate, copyNewer, copyDifferent, or eraseThenCopy. And succeeded is true or false—which is what most Shortcuts will key off of (it’s absent entirely in the before phase, since the copy hasn’t run yet—more on phases next).
mode is run for the normal hand-off around a copy—which is almost always what you’ll see, and what every example here is about. It’s setup only during the one-time configuration pass described in Letting a Shortcut ask you something, below. A Shortcut that doesn’t need to be set up can simply ignore it. (Don’t confuse mode with phase: mode is run vs setup; phase, covered next, is before / after / error within a normal run.)
When your Shortcut runs
We don’t only run your Shortcut at the end. We run it twice around each copy—once before it starts, and once when it ends—and the phase value tells you which run you’re in. It’s one of three values:
before—just before the copy starts, before a single file is touched. This is your chance to get ready: quit an app that’s holding files open, pause something noisy, post a “starting now” message. Nothing has happened yet, so succeeded is absent in this phase.after—the copy finished and succeeded. succeeded istrue.error—the copy failed. succeeded isfalse, and the failure-only error_reason and error_log are included.
So the first thing a well-behaved Shortcut does is look at phase and decide whether this is a moment it cares about. A “tell me when a backup finishes” Shortcut ignores before. A “quit Mail before backing up” Shortcut acts only on before. A “write every run to a log” Shortcut might act on all three.
If you never look at phase at all, your Shortcut simply runs the same actions twice per copy—once for before, then once for after (or error)—doing the same thing each time. That’s rarely what you want, so branch on it.
Note
Keying on succeeded still works exactly as it always did:
trueon success,falseon failure. And because succeeded is absent duringbefore, a Shortcut that only asks “is succeededfalse?” won’t fire its failure branch before the copy has even run. The one thing to watch: a Shortcut that does real work unconditionally now does it before AND after every copy, unless you look at phase first.
Stats fields (optional)
On top of the baseline keys above, most copies also hand your Shortcut a set of statistics about what the run actually did. They’re handy when you want to brag in Slack (“47,328 files, 184 GB, 22 minutes”), gate on whether anything was actually copied, or keep a running log of throughput over time.
Every one of these is optional. They’re present on most Smart Update / Copy Newer / Copy Different runs, and absent on Erase, then copy runs (which use a different copy engine that doesn’t publish per-file counts). They can also be absent on a run that failed before the stats were tallied. So treat them the way you’d treat any optional dictionary key: pull the value, and check it before you use it. In Shortcuts, the easiest way is to use If with the condition Dictionary Value has any value.
| Dictionary key | Description |
|---|---|
| files_copied | Number of files actually written to the destination this run. |
| files_evaluated | Number of files SuperDuper examined while deciding what to copy. Always larger than files_copied, since most files on a typical Smart Update don’t need to be copied again. |
| files_updated_meta_only | Number of files where only the metadata changed (permissions, dates, flags) without rewriting the file’s contents. |
| files_deleted | Number of files removed from the destination because they were no longer on the source. |
| bytes_copied | Total bytes actually written this run. |
| bytes_evaluated | Total bytes examined this run. |
| scout_total_files | Total number of files seen by the initial scan of the source. |
| scout_total_bytes | Total bytes seen by the initial scan of the source. |
| errors | Number of errors that stopped at least one file from being copied. |
| ignored_errors | Number of errors that were noted but didn’t stop the copy (typically transient issues on files that don’t matter for the backup). |
| effective_rate_bps | Overall throughput for the run, in bytes per second. |
| elapsed_seconds | How long the run took, in seconds. |
An example: only post to Slack when something actually changed
A nightly Smart Update where nothing’s changed since yesterday will have files_copied equal to 0. If your team doesn’t need a daily “yep, still backing up” ping, you can suppress those:
- Receive Input.
- Get Dictionary Value with the key
files_copied. - If Dictionary Value
is greater than0… post to Slack. Otherwise, do nothing.
You can do the same trick with bytes_copied if you’d rather gate on size, or combine the two—”post if more than 1 GB changed.”
Why would you post this to Slack? To encourage your co-workers to buy SuperDuper, of course. Or to annoy them. You do you.
Getting the log
Two failure-only keys and one that’s always there give your Shortcut the copy’s log in whatever form suits it.
Alongside the inline error_log that’s already there on failure, the dictionary also includes error_log_path—a path to a file on disk containing the same log text. Use error_log when you want the text right there in the body of an email (or Slack message); use error_log_path when you want to attach or upload the complete transcript without copy-pasting through a string. The Get File from Path action takes the path and gives you a file you can pass to Send Email as an attachment, Get Contents of URL as an upload, or Append to File to roll up into a longer archive. Both are only present on failure, and only when there was log output worth saving—so check for them before using them, same as the stats fields.
Separate from those, every run (success or failure) also hands you log_path: the path to that copy’s complete log on disk (the same log the copy job keeps in its history, under /Library/Logs/SuperDuper 4/). When you want the whole transcript no matter how the copy went—to archive it, attach it, or scan it for a particular line—give log_path to Get Contents of File. Unlike error_log_path, it’s there on success too, so it’s the key to reach for when you want “the log of every run.”
Note
Your Shortcut runs as you, not as root. That means it sees the same library it sees from Shortcuts.app, and anything it talks to (Mail, Slack, Messages, and so on) sees the request as coming from you. Permissions you grant the first time stick around for next time.
The one edge case: if nobody’s logged in—a Mac at the login window when a scheduled copy fires at 3 a.m.—there’s no user session to run the Shortcut in, and it’s quietly skipped.
Reading the input in your Shortcut
When your Shortcut runs, the dictionary is sitting at the top, as the Shortcut Input. The action you’ll use most is Get Dictionary Value. Give it a key like succeeded, get the value back. The most common shape looks like:
- Receive Input (any from anywhere).
- Get Dictionary Value, with the key
succeeded. - If that’s
true… (success branch) …Otherwise… (failure branch).
You can see this exact pattern in the template.
Inside either branch, pull whatever else you need with more Get Dictionary Value actions, then do something with it.
An example: email me, but only when something fails
This is probably why you’re reading this chapter. You don’t want to hear from us when things work. You do want to hear when they don’t. Here’s how to set it up (or you could look at what we already provided).
- Create the Shortcut. Open Shortcuts and choose File ▸ New Shortcut. Give it a name you’ll recognize when you come back to pick it: “SD4: Email me on failure” is fine.
- Receive the input. Drag in a Receive Input action at the top, set to accept anything from anywhere.
- Branch on success. Add Get Dictionary Value with the key
succeeded. Then add an If with the condition Dictionary Valueisfalse. Everything that follows goes inside the If. - Pull the fields you want in the email. Inside the If, add four more Get Dictionary Value actions, one each for
copy_job_name,destination_name,error_reason, anderror_log. Build the email body. Add a Text action for the body. Type something like:
Copy job: [copy_job_name]
Destination: [destination_name]
Reason: [error_reason]

Log:
[error_log]
…where each
[bracketed name]is the Magic Variable from the corresponding Get Dictionary Value.- Send it. Add a Send Email action. Recipient is you. Subject is something like
SuperDuper failed: [copy_job_name](using the Magic Variable again). Body is the Text you just built.
Caution!
Turn off Show When Run on the Send Email action. With it on, the email won’t actually send—you’ll get a confirmation dialog instead, which is useless at 3 a.m. when the failure happened.
Leave the Otherwise branch empty—silence on success. Then, back in SuperDuper, click on completion in the copy job, turn on Run a Shortcut in the Always section, and pick your new Shortcut. From now on, you’ll only hear from us about this copy when there’s actually something to look at.
The same general pattern (branch on succeeded, pull fields, do something) covers “post to Slack on failure,” “play a particular sound on failure,” “open the log file on failure,” and anything else along those lines.
Letting a Shortcut ask you something…once
Some Shortcuts need to know something before they can do their job: the Slack webhook URL to post to, an email address that isn’t yours, an API token for some service. You could type it straight into the Shortcut and hard-code it, but then it’s buried in there, and changing it means digging back into Shortcuts.app to find it.
There’s a friendlier way. The moment you pick a Shortcut, SuperDuper runs it once right then—with you sitting in front of it, in a special setup mode—so it can ask whatever it needs to ask. Whatever your Shortcut hands back, we save and keep with the copy job, and from then on, every time the copy finishes, we hand that saved answer straight back to it. It never has to ask again. A checkmark next to the Shortcut’s name means it’s been set up.
That one run when you pick it is also the right moment to grant any permissions the Shortcut needs. Because it happens with you right there, macOS can put up its permission prompts (Contacts, Mail, a file folder, whatever) and you can say yes. Granted once, they stick, so the unattended run later just works. So lean into setup: ask for everything you’ll need, and trigger every permission you can, right then.
Ask with our actions, not Shortcuts’
Here’s the one wrinkle, and it catches everybody the first time: during the setup pass, Shortcuts’ own question actions can’t put anything on screen. Ask for Input, Choose from List, Show Alert—they run, they hand back nothing, and your Shortcut sails straight past them as though you’d answered instantly with silence.
It isn’t a bug in your Shortcut, and it isn’t a permission you can grant. When one app asks Shortcuts to run a Shortcut on its behalf, macOS runs it in a quiet, off-screen mode with its dialogs switched off. Nothing you write inside the Shortcut changes that.
So we added two actions of our own. They belong to SuperDuper, they run inside SuperDuper, and they put the question up on your screen where you can actually answer it:
Ask for Setup Text asks a question and hands back what you type. Give it a Question, and a Default Answer if you’d like the field to start with something.
Ask for Setup Choice asks a question and hands back what you picked from the list of Options you supply. Turn on Select Multiple and you get checkboxes instead of a single pick, and it hands back everything you ticked—possibly nothing at all, which is a perfectly good answer to “when should I email you?” Select All Initially starts every box ticked, so you’re unticking what you don’t want rather than hunting for what you do. Both work exactly as they do in Shortcuts’ own Choose from List.
Initially Selected goes one better: hand it a list of options and exactly those start ticked. Feed it what you saved last time—straight out of setup_data—and re-configuring opens on your previous answer instead of all-or-nothing. Leave it empty and Select All Initially decides instead, so the same wiring still does something sensible the very first time, when there’s nothing saved yet. (A single-pick question uses it too: the list’s first entry opens as the current choice.)
Both wait two minutes. Cancel one, or wander off and let it time out, and the Shortcut stops with an error and nothing is saved—deliberately, so a half-finished setup can never masquerade as a finished one. Pick the Shortcut again in SuperDuper to start over.
Use these during setup and nowhere else. On a normal run nobody’s watching, so the question would just sit there until it timed out and took the Shortcut down with it.
Caution!
Remember: picking a Shortcut runs it once, right then, in setup mode. A Shortcut that wasn’t built to expect that will simply run its normal actions instead—so if yours does real work (sends a message, writes a row to a file), have it look at mode first and do nothing when it’s
setup. The example below shows the shape, as does the template.
Handing your answer back
Two keys make this work. mode tells your Shortcut why it’s running: setup the one time SuperDuper runs it when you pick it; run every time after that. And setup_data is whatever your Shortcut handed back the last time it was set up, given right back to it on every run—and at setup, so a Shortcut you’re re-configuring can offer your previous answers as the defaults instead of starting from nothing.
When there’s nothing saved yet—a genuine first run—the setup_data key isn’t there at all. It’s absent rather than empty, so the way to check is If Dictionary Value has any value, exactly as you would for the optional stats fields. Test before you pull anything out of it.
Re-picking the same Shortcut keeps what you’d already saved, so cancelling halfway through leaves your existing settings alone. Picking a different Shortcut starts clean—one Shortcut’s saved settings mean nothing to another.
There are two ways to hand it back, and you can use whichever suits the Shortcut.
Make it the Shortcut’s output. Whatever the Shortcut stops and outputs during setup is what we save. Hand it back as text: if it’s a single value, that’s just the text; if it’s several, build a Dictionary, then add Get text from Dictionary and output that—the dictionary as JSON text. The text rule matters, because an output that isn’t text doesn’t survive the trip back to us intact. We save what you hand over, and because it’s JSON we hand it back as a dictionary on every run, so Get Dictionary Value drops right into it.
There’s a Get Setup Info action too, taking a Job and handing back what was saved with it. You won’t need it for a Shortcut SuperDuper runs—that one already receives its settings—but it’s there for reading another copy job’s settings, or for a Shortcut you run yourself. A job with nothing saved hands back nothing, so the same has any value check applies.
Or save it yourself with Save Setup Info. Our third new action takes a Job and some Setup Info text and files it with that copy job—the same place the output route fills, read back the same way. Two reasons to prefer it: your answer doesn’t have to be the last thing the Shortcut does, so setup can carry on afterwards (triggering permissions, say); and because you’re handing us a value directly rather than routing it back out through the Shortcut’s output, it can’t be garbled on the way. You still convert a dictionary to text first—this action takes text too—but text that arrives this way arrives exactly as you sent it. To name the job, use Get Job by Identifier with the copy_job_id from the input we hand you at setup. Leave the text empty and it clears whatever was saved.
An example: email an address you set once, and only for the outcomes you care about.
- Receive Input, then Get Dictionary Value with the key
mode. - If Dictionary Value
issetup:- Ask for Setup Text, question “Where should backup results go?”
- Ask for Setup Choice, question “When should I email you?”, options On success and On failure, with Select Multiple on (and Select All Initially too, if you’d rather start from everything).
- Build a Dictionary with the address under
user_emailand the picks underemails_wanted. - Get text from Dictionary, and either leave that as the Shortcut’s output or pass it to Save Setup Info along with Get Job by Identifier of
copy_job_id.
- Otherwise (it’s a
run):- Get Dictionary Value with the key
setup_data—everything you answered at setup. - Pull
user_emailandemails_wantedout of it, decide whether this outcome is one you asked about, and Send Email if it is.
- Get Dictionary Value with the key
Pick the Shortcut in SuperDuper—which runs the setup pass on the spot—answer the two questions, and from then on every copy emails that address, exactly when you said, no questions asked.
A few other ideas
Log every run to a spreadsheet. Skip the If entirely. Pull the fields you want into a Text action and Append to File at, say, ~/Library/Logs/SuperDuper-runs.csv. A few months later you’ve got a tidy history without ever having typed an entry.
Slack on success too. Replace Send Email with Get Contents of URL, set to POST a JSON body to a Slack incoming webhook. Your team gets a message at the end of every backup. (Put the same call in the failure branch with a different message and they get to share in the bad news, too.)
A different sound for success vs. failure. If on succeeded, then Play Sound twice with different files. Pleasant for success, less so for failure. Surprisingly satisfying.
There’s nothing magic about any of these—every one is just a few Shortcuts actions chained around the data we hand you. The ceiling is what Shortcuts itself can do, which is quite a lot.
When something isn’t working
A few things to check, in order of likelihood.
The Shortcut never ran. The usual reason is that nobody was logged in when the copy finished—a scheduled run overnight, with the Mac at the login window. Without a user session, we can’t run a Shortcut. Log in, run the copy manually, and you should see it fire.
The setup question never appeared. If you’re using Shortcuts’ own Ask for Input, Choose from List or Show Alert during setup, that’s expected—they can’t show anything when SuperDuper runs a Shortcut for you. Swap them for our Ask for Setup Text and Ask for Setup Choice actions, described above, and pick the Shortcut again.
The Shortcut ran but couldn’t do something. Almost always permissions. Grant them while you’re watching: re-pick the Shortcut in the copy job (picking it runs it once, right then), or just press the Shortcut’s play button in Shortcuts.app. macOS will prompt you for whatever it needs (Mail, Slack, file access). Once those are granted, the Shortcut will work when SuperDuper runs it for you, too.
If it works when you press play in Shortcuts.app but still does nothing when SuperDuper runs it—typically a step that controls another app, like telling Mail or Contacts to do something—it needs to run through the Shortcuts app rather than quietly in the background. Add a run_via_app key set to true to the dictionary you hand back at setup, and SuperDuper will run it that way every time. (Most Shortcuts never need this; without it, they run the quick, direct way.)
The Shortcut stopped firing after I renamed it. We match by name, so a rename in Shortcuts.app breaks the link. Just come back to the copy job, click on completion, and pick the Shortcut by its new name.
That’s the whole feature. Small, but because it leans on everything Shortcuts can already do, it covers a surprising amount of what you might want to happen at the end of a copy.
-
You will have to enable the ability to run AppleScript and Shell Scripts in the Shortcut settings. ↩︎
Running SuperDuper! from a shortcut
The previous chapter was about SuperDuper running your Shortcut—handing off to you when a copy starts, finishes, or fails. This chapter is the mirror image: your shortcuts running SuperDuper.
SuperDuper 4 puts its important operations right into Shortcuts as actions. Run a copy job. Check whether it’s running, and how far along it is. Read how the last run went—or the last ten. Change a job’s settings, or create a brand-new job from nothing. Anything that can run a shortcut can now drive SuperDuper: a click in the menu bar, Spotlight, Siri, a keyboard shortcut, another shortcut, even the shortcuts command-line tool. If you’ve ever wanted a “back everything up now” button, this is the chapter where you build it.
The actions
Open Shortcuts, start a new shortcut, and search for SuperDuper in the actions list. Here’s what you’ll find:
| Action | What it does |
|---|---|
| Run Job | Starts a copy job. Returns as soon as the copy is underway—or, optionally, waits for the result. |
| Get Job Status | Tells you whether a job is idle, queued, or running—with progress when it’s running. |
| Get Job Results | Returns a job’s most recent completed runs: outcome, what was copied, when. |
| Get Job Settings | Reads a job’s settings: copy mode, schedule, after-copy actions, copy rule, readiness. |
| Set Job Settings | Changes a job’s settings. Anything you leave empty is left alone. |
| Create Job | Builds a new copy job from a source and destination, ready to run. |
| Delete Job | Removes a copy job—the configuration only, never the files it copied. |
| Get Jobs for Source | Lists the jobs configured to copy from a given drive, share, or folder. |
There are also three small helpers—Get Job by Identifier, Get Source by Identifier, and Get Run Result by Identifier—that turn a saved identifier back into the real thing. More on those in Names vs. identifiers, below. (And one diagnostic, SuperDuper Daemon Ping, which we’ll meet in the troubleshooting section.)
Most of these actions take a Job parameter. Click it and you get a picker listing every copy job by name, with its source and destination right underneath—the same jobs, in the same terms, as the app’s sidebar. Pick one and you’re done; you can also type to filter the list.
Running a copy
The action you came here for. Drop in Run Job, pick the job, run the shortcut. That’s genuinely all there is to it.
One decision is worth understanding: when does the action return? By default, Run Job returns as soon as the copy is underway—you’ll get “started copying,” and the copy carries on by itself, exactly as if you’d pressed Copy in the app. A backup can take minutes or hours, and most shortcuts shouldn’t sit there holding their breath.
If you want to hold your breath—say, the next step in your shortcut needs the backup to be done—turn on Wait Until Finished. The action then waits and returns when the copy completes. Two things to know about waiting:
- If the copy fails while you’re waiting, the action itself fails, which stops the shortcut and shows the reason. That’s usually what you want—but it means steps after Run Job only happen on success.
- Waiting is best for copies of predictable, modest length—a routine Smart Update, for instance. For an hours-long first copy, prefer the default: let it return at the start, and check on things later with Get Job Status or Get Job Results.
A few niceties, so your shortcuts don’t have to be defensive:
- If the job already has a copy running (or queued), Run Job won’t stack a second one—it tells you a copy is already going and leaves it be.
- If another copy is using the same destination, the job queues and starts automatically when the destination frees up. The action says so.
- The same safety checks the app makes before a copy apply here too. If a drive isn’t connected, or doesn’t check out as the one the job was set up with, the action refuses with an explanation rather than guessing. And if SuperDuper is locked, copies can’t be started from Shortcuts at all—unlock it in the app first.
Checking on a job
Get Job Status answers “what’s happening right now?” It returns one of three states—Idle, Queued, or Running—and, while running, a progress snapshot: Percent Complete, Bytes Copied, and the Current Item being copied. (The progress fields are only present while a copy is actually running, so check them before using them.)
Get Job Results answers “how did it go?” It returns the job’s most recent completed runs, newest first—ask for anywhere from 1 to 10 (each job keeps its last 10). Each result carries:
| Property | What it is |
|---|---|
| Outcome | Succeeded, Failed, or Cancelled. |
| Succeeded | The same thing as a simple true/false—the easiest thing to branch on. |
| Summary | The one-line description you’d see in the job’s history in the app. |
| Bytes Copied | Total bytes written during the run. |
| Items Copied | Files written to the destination. |
| Items Updated | Files where only metadata changed (permissions, dates, flags). |
| Items Deleted | Files removed from the destination because they left the source. |
| Started / Ended | When the run began and finished—real dates, so Shortcuts can format or compare them. |
| Source / Destination | The endpoints, by name. |
| Catch-Up Run | Whether this was a scheduled copy that ran late (the Mac was asleep or off at the appointed time). |
| Identifier | A stable handle for this specific run—see the next section. |
To pull a property from a result, click the result’s variable pill in a later action and choose the property you want—Succeeded, Summary, and so on.
An example: a morning “did my backup run?” check
- Get Job Results for the job you care about, with How Many set to 1.
- If—condition: the result’s Succeeded property
isfalse. - Inside the If, Show Notification (or send yourself an email), with the result’s Summary in the body.
- Otherwise, nothing. Silence means all is well.
Run it manually with your coffee, or wire it up to run however you like to trigger shortcuts. Compare this with the previous chapter’s email-on-failure approach: that one fires the moment a copy fails; this one lets you ask after the fact. They’re complementary—use whichever fits how you like to be told, or both.
Names vs. identifiers
When you pick a job in an action’s picker, the shortcut holds onto that job—not its name. Rename the job in SuperDuper and the shortcut keeps working. So for most shortcuts, you never think about this.
But suppose you’re building something fancier: a shortcut that reads a list of jobs from a file, or a menu of choices, or one shortcut shared between two Macs. Now you need to store a reference to a job as text—and names are the wrong thing to store, because names aren’t unique. There’s nothing stopping two jobs from both being called “Backup.”
That’s what the Identifier property is for. Every job, source, and run result carries one: a stable string that never changes, no matter what the job is renamed to. Save it anywhere text can go, and when you need the real thing back, hand it to Get Job by Identifier (or Get Source by Identifier, or Get Run Result by Identifier). If nothing matches—the job was deleted, say—the action fails and says so, rather than quietly grabbing something with a similar name. In SuperDuper, close enough isn’t.
Creating a job
Create Job builds a complete, persisted copy job—the same as adding a new job in the app—and returns it, ready to feed straight into Run Job. Both drives must be connected when you create the job, so SuperDuper can capture their identities properly.
| Parameter | What it does |
|---|---|
| Source | The drive, share, or folder to copy from. |
| Destination | The drive or share to copy to. |
| Folder on Source | Optional: copy just this folder from the source (for example Users/dave/Documents). Leave empty for the whole volume. If the source you picked is already a folder, that folder wins and this is ignored. |
| Folder on Destination | Optional: copy into this folder on the destination rather than the whole volume. |
| Copy Mode | Smart Update (the default), Copy Newer, Copy Different, or Erase, then copy—see Copy modes. |
| Scheduled | Off by default. On gives the job a starter schedule—weekdays at 11:00 PM—which you can change in SuperDuper any time. |
| After Copying | Do nothing, Sleep, Restart, or Shut Down. |
| Eject Destination When Done | Just what it says, after a successful copy. |
| Copy Rule | Which files to copy. Leave empty for Backup - all files—see Customizing what gets copied. |
The same guardrails you’d hit in the app apply here, with the same explanations: the startup disk can’t be a destination (copying over the running system would destroy it), an NTFS disk can’t be a destination (Macs can’t write to it), and a drive can’t be its own destination. The picker steers you away from all of these; if a variable sneaks one in anyway, the action refuses and says why.
Changing and deleting jobs
Set Job Settings changes exactly what you set and nothing else—every parameter you leave empty keeps its current value. It covers the same settings Create Job does: copy mode, schedule on/off, after-copy action, eject, and copy rule. (What it deliberately doesn’t cover: the source and destination. Re-pointing a job at different drives is a decision for the app, where you can see exactly what you’re picking.)
Delete Job removes a copy job—and asks you to confirm first, because picking the wrong job in a shortcut is easy to do. Two things follow from that. First: deleting a job only removes the configuration—the files it copied to your destination are never touched. Second: because it stops to ask, it’s meant for shortcuts you run interactively, not unattended ones.
An example: one button that backs up everything for a drive
Say you have several jobs you think of as “my backups”—your startup disk, your photo library, a folder of projects. Here’s a single shortcut that runs them all, in order, and tells you when it’s done:
- Run Job for the first job, with Wait Until Finished turned on.
- Another Run Job for the next job, also waiting. Repeat for as many jobs as you have.
- Show Notification: “All backups finished.”
Because each action waits, the jobs run in sequence—and if any copy fails, the shortcut stops right there with the reason, so “All backups finished” only appears when it’s true.
If the jobs share something in common—everything copying from one drive, say—Get Jobs for Source saves you the bookkeeping: pick the source, Repeat with Each over the jobs it returns, and inside the repeat, Run Job with Job set to the Repeat Item (waiting, as before). Add a job for that drive next month and the shortcut picks it up automatically, no editing required.
Either way, put the shortcut in the menu bar (in Shortcuts, open the shortcut’s details and check Pin in Menu Bar) and you’ve got that “back everything up now” button.
A few other ideas
Back up before you walk out the door. A “Leaving” shortcut: Run Job with Wait Until Finished on, for a job whose settings include Eject Destination When Done. When the notification arrives, the copy is complete and the drive is ready to unplug and go.
Ask Siri. Shortcuts run by voice, so “run my backup shortcut” works—handy when your hands are full of the very laptop you’re about to take somewhere.
From the command line. macOS ships a shortcuts tool, so shortcuts run "Back Everything Up" does exactly what it looks like—which means anything that can run a command can now run your backups.
Close the loop with the previous chapter. The job you run from a shortcut can itself run a Shortcut when it finishes—so one shortcut can start the copy, and another can announce the result to Slack. (Resist the temptation to have the completion shortcut run the job again. Infinite backups are still finite drives.)
When something isn’t working
The actions don’t appear in Shortcuts. Open SuperDuper once—Shortcuts learns about an app’s actions when the app is installed and run. If they still don’t show, quit and reopen Shortcuts; its action list can lag behind.
“SuperDuper isn’t available right now.” Open SuperDuper once so it can finish setting up, then run the shortcut again.
“SuperDuper is locked.” Copies can’t be started from Shortcuts while SuperDuper is locked. Unlock it in the app—see Scheduling and automatic copies—and run the shortcut again.
A drive-related refusal. The same refusals you’d see in the app: a drive isn’t connected, or can’t be verified as the one the job was set up with. The message says what to do—usually connect the drive, or open SuperDuper and re-pick it for that job.
Not sure whether SuperDuper is reachable at all? Run the SuperDuper Daemon Ping action by itself in a test shortcut. It checks the connection and reports status in plain language—useful to rule things out before looking at the shortcut itself.
Between this chapter and the last one, the loop is closed: SuperDuper can hand off to Shortcuts, and Shortcuts can drive SuperDuper. Backups that start themselves, check themselves, and report themselves—which is exactly how backups should be.